4 minutes
Node Connections With Netreplica and Containerlab
Introduction
Thank you all for checking out another blog post. All the support for the blog has been tremendous and I can’t thank you all enough. Packet Pushers invited me to write on their platform and it’s been a pleasure working with Drew and team. If you would like to check those out, I will link them at the end of this post! Today we will focus on an interesting tool in the community, Netreplica, but specifically Graphite.
Some time ago Alex(@bortok) shared an example of using NextUI to build a visual from a Containerlab file. I asked if there was a way to click on the icon and just open an SSH session. This could then open a terminal like SecureCRT, web page, or some other means of interacting with a session.

Netreplica Graphite
I’ll walk through an example to get going and current pros and cons. Please note, Graphite is on initial phases of development. Please reach out to the folks at Netreplica(GitHub link below) for any feedback. There’s a couple options to get going with Graphite but I found standing up a container within a Containerlab file was the most simple. In the example below we are running 4 containers. One is a standalone container(ssh) with no connections to the rest of the topology. The Graphite container is using a special tag with the webssh implementation.
simple.yaml
name: simple
prefix: ""

mgmt:
  network: statics
  ipv4_subnet: 172.100.100.0/24

topology:
  kinds:
    srl:
      image: ghcr.io/nokia/srlinux
  nodes:
    pdx-rtr-01:
      kind: srl
      mgmt_ipv4: 172.100.100.11
    pdx-rtr-02:
      kind: srl
      mgmt_ipv4: 172.100.100.12
    pdx-rtr-03:
      kind: srl
      mgmt_ipv4: 172.100.100.13
    ssh:
      kind: linux
      image: netreplica/graphite:webssh2
      mgmt_ipv4: 172.100.100.100
      env:
        GRAPHITE_DEFAULT_TYPE: clab
        GRAPHITE_DEFAULT_TOPO: simple
        CLAB_SSH_CONNECTION: ${SSH_CONNECTION}
      binds:
        - .:/htdocs/clab
      ports:
        - 8080:80
      exec:
        - sh -c 'generate_offline_graph.sh'
        - sh -c 'graphite_motd.sh 8080'
      labels:
        graph-hide: yes
  links:
    - endpoints: ["pdx-rtr-01:e1-1", "pdx-rtr-02:e1-1"]
    - endpoints: ["pdx-rtr-01:e1-2", "pdx-rtr-03:e1-1"]
    - endpoints: ["pdx-rtr-02:e1-2", "pdx-rtr-03:e1-2"]
There’s a couple things to note:
- Static IP addresses for management required.
- Topology file should be shorthand and use longer yaml syntax. For example
simple.clab.ymlwill not work, butsimple.yamlwill.
❯ sudo -E containerlab deploy -t simple.yaml
INFO[0000] Containerlab v0.25.1 started
INFO[0000] Parsing & checking topology file: simple.yaml
INFO[0000] Creating lab directory: /home/juliopdx/git/gcl/clab-simple
INFO[0000] Creating docker network: Name="statics", IPv4Subnet="172.100.100.0/24", IPv6Subnet="", MTU="1500"
INFO[0000] Creating container: "ssh"
INFO[0000] Creating container: "pdx-rtr-03"
INFO[0000] Creating container: "pdx-rtr-02"
INFO[0000] Creating container: "pdx-rtr-01"
INFO[0000] Creating virtual wire: pdx-rtr-01:e1-1 <--> pdx-rtr-02:e1-1
INFO[0000] Creating virtual wire: pdx-rtr-01:e1-2 <--> pdx-rtr-03:e1-1
INFO[0000] Creating virtual wire: pdx-rtr-02:e1-2 <--> pdx-rtr-03:e1-2
INFO[0001] Running postdeploy actions for Nokia SR Linux 'pdx-rtr-01' node
INFO[0001] Running postdeploy actions for Nokia SR Linux 'pdx-rtr-02' node
INFO[0001] Running postdeploy actions for Nokia SR Linux 'pdx-rtr-03' node
INFO[0015] Adding containerlab host entries to /etc/hosts file
INFO[0015] Executed command 'sh -c 'generate_offline_graph.sh'' on ssh. stdout:
Visualizing topology: simple.yaml
--truncated--
+---+------------+--------------+-----------------------------+-------+---------+--------------------+--------------+
| # |    Name    | Container ID |            Image            | Kind  |  State  |    IPv4 Address    | IPv6 Address |
+---+------------+--------------+-----------------------------+-------+---------+--------------------+--------------+
| 1 | pdx-rtr-01 | 81cd5aa9e62e | ghcr.io/nokia/srlinux       | srl   | running | 172.100.100.11/24  | N/A          |
| 2 | pdx-rtr-02 | 29a158c32b37 | ghcr.io/nokia/srlinux       | srl   | running | 172.100.100.12/24  | N/A          |
| 3 | pdx-rtr-03 | 4fe7e0beac6f | ghcr.io/nokia/srlinux       | srl   | running | 172.100.100.13/24  | N/A          |
| 4 | ssh        | 3eb1e14ca34c | netreplica/graphite:webssh2 | linux | running | 172.100.100.100/24 | N/A          |
+---+------------+--------------+-----------------------------+-------+---------+--------------------+--------------+
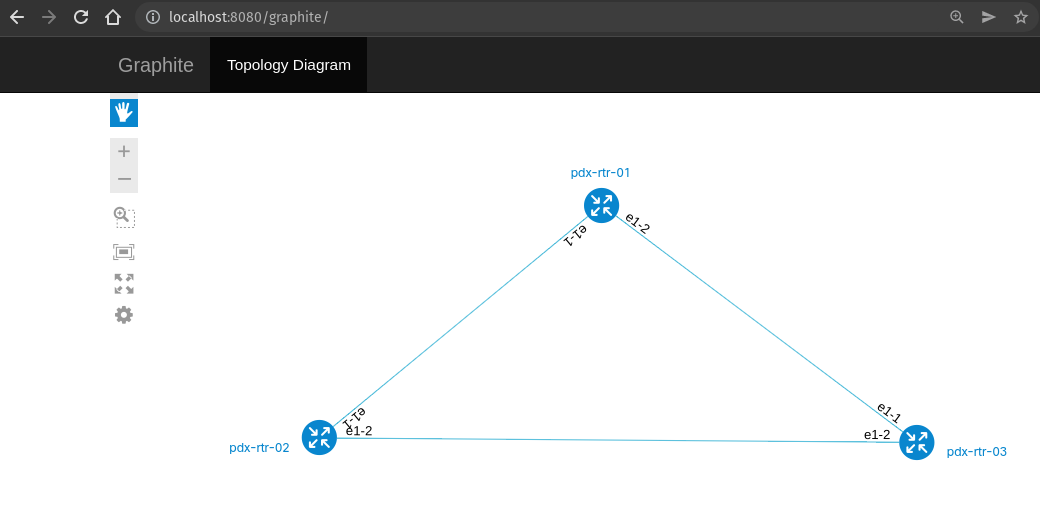
Now that we’ve deployed the topology, we can go to localhost:8080/graphite/. In my case I’m running Containerlab on my local laptop. Depending on your Containerlab file, you should see something like below.

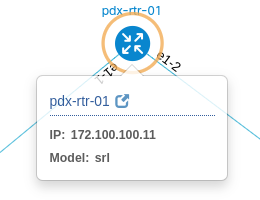
Here’s where it gets fun. Check out what happens when we click on one of the nodes.

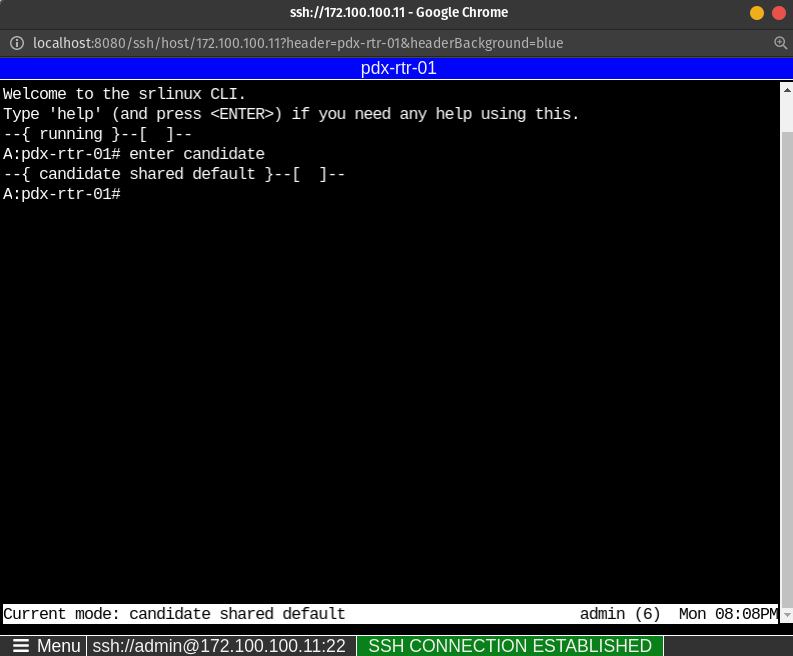
Now if we click on that link within the node, you will get a new connection window. In this case, I get a new Chrome window to the selected device.

Final Thoughts and Links
I’m a big fan of these tools that are making the lives easier for end users. Whether getting started with containers, learning network technologies, or just lowering the barrier of entry. Check out Graphite if you get a chance and reach out to the team on GitHub if you have any feedback or issues. Thank you for reading this far and I wish you all the best!