9 minutes
How to Generate Cisco Lifecycle Documentation With Python and APIs
Introduction
I was recently in a Twitter conversation with a few network engineers, in that feed was great dialogue on how often folks upgrade their network environments. Whether its when a massive vulnerability hits or just keeping up with vendor recommended releases. I mentioned that the Cisco Support APIs are an incredible resource. These APIs allow users with the appropriate access to get information about their devices. This could be recommended software releases, EoX dates, last day of support, vulnerabilities, and others.
I wanted to see if there was a way to incorporate a few of these APIs together to create meaningful documentation for the operator in the field. This documentation could then be used to plan out device upgrades, replacements, or just a way to track software versions of the entire device fleet. I hope you find something useful or maybe take bits and pieces so it may help you in your environment.
Cisco Support APIs
As mentioned earlier, these APIs really are an incredible resource. If you are a Cisco Smart Net Total Care customer or a Cisco Partner Support Services partner, you most likely have access to these APIs. If you would like to follow along you will have to register an application to get started. It sounds more daunting than it really is, check out this guide to get that process started.
Handling Support API Authentication
When interacting with APIs there are usually a few options to choose from. You may use a username/password combination, token, or a combination of client IDs and secrets. I chose the latter. The default timer for tokens used for the support APIs is good for about one hour. This will require the user to reauthenticate every hour. I tried to keep this simple by having a local credentials.yaml file in the repo, which is then added to the .gitignore file.
credentials.yaml example
support_client_id: SomeClientId
support_client_secret: SomeClientSecret
Once you have the client ID and client secret from the app that is registered. You can execute the auth.py script in the repo. Repository is linked at the bottom of this post!
auth.py
import requests
import yaml


URL = "https://cloudsso.cisco.com/as/token.oauth2"

with open("./credentials.yaml", encoding="utf-8") as file:
    myvars = yaml.safe_load(file)

payload = f"grant_type=client_credentials&client_id={myvars['support_client_id']}&client_secret={myvars['support_client_secret']}"

headers = {
    "Content-Type": "application/x-www-form-urlencoded",
}

response = requests.request("POST", URL, headers=headers, data=payload)

if response.status_code == 200:
    with open("credentials.yaml", encoding="utf-8") as f:
        creds = yaml.load(f, Loader=yaml.SafeLoader)

    creds["support_auth_token"] = response.json()["access_token"]

    # Rewriting credentials.yaml with new token variable
    with open("credentials.yaml", "w", encoding="utf-8") as f:
        yaml.dump(creds, f)
        print("Auth token updated successfully!!!")
else:
    print("Failed to update token, please check client ID or client secret")
At the top of the script we are importing requests to interact with APIs and yaml for working with yaml files. This will then load the current client secret and client ID from our credentials.yaml file. On line 16 we run our API POST call to retrieve a token. This token can then be used to interact with the support APIs. The second half of the script will essentially recreate the credentials.yaml file, but with the token now in place. Example below!
credentials.yaml
support_auth_token: SomeToken
support_client_id: SomeClientId
support_client_secret: SomeClientSecret
Chicken and Egg Problem
Now that we have a working token, we could use this to run some kind of API GET to gather some data about a device or platform based on the serial number or part ID. Here is the main issue I ran into. The support APIs require either a serial number or part ID to gather relevant information. At some point you will need an inventory or a list of serial numbers to feed into the APIs to gather information for you. I am cheating a bit and started with an inventory file of three devices. This inventory only included the device IP addresses and their platform for handling connections. Example inventory below.
hosts.yaml
---
# Please note, the cisco_ios group is only used to set the device platform type
some-router-01:
  hostname: "192.168.10.10"
  groups:
    - cisco_ios

some-router-02:
  hostname: "192.168.10.11"
  groups:
    - cisco_ios

some-other-node:
  hostname: "192.168.10.12"
  groups:
    - cisco_ios
Imports and CSVs
We will be using Nornir and NAPALM for the initial connection to our devices. The csv import is used for creating our file with all of our information. The yaml import is used to interact with our credentials.yaml file and load the token. You may notice a lot of imports from “tools”, these are a few neat functions I made for this small project. More on those in a bit.
info.py imports and auth
import csv
import yaml
from nornir import InitNornir
from nornir_napalm.plugins.tasks import napalm_get
from tools import manu_year_cisco, nornir_set_creds, product_info, software_release, eox


with open("./credentials.yaml", encoding="utf-8") as file:
    myvars = yaml.safe_load(file)

my_token = myvars["support_auth_token"]
Moving a bit down on the script is the initial interaction with a csv file. We will use the CSV library to create our file and write a few headers that will soon be populated with relevant information.
info.py snippet
with open("device_info.csv", mode="w", encoding="utf-8") as csv_file:
    fieldnames = [
        "Name",
        "Platform",
        "Model",
        "Base_PID",
        "Replacement",
        "Serial",
        "EoS",
        "EoSM",
        "LDoS",
        "EoCR",
        "Manufacture Year",
        "Current SW",
        "Recommended SW",
    ]
    writer = csv.DictWriter(csv_file, fieldnames=fieldnames)
    writer.writeheader()
Nornir and NAPALM
This script utilizes Nornir and NAPALM for the initial device connection. This is only used for a very small run to use a NAPALM getter. In this case we are using the “get_facts” getter. This will retrieve a ton of useful information. For my case I will be capturing the hostname, model, version, serial, and platform. Snippet below of this process.
info.py snipper
def all_the_things(task):
    """It does all the things"""
    task1_result = task.run(
        name=f"Get facts for {task.host.name}!", task=napalm_get, getters=["get_facts"]
    )

    name = task1_result[0].result["get_facts"]["hostname"]
    model = task1_result[0].result["get_facts"]["model"]
    ver = task1_result[0].result["get_facts"]["os_version"]
    version = ver.split(",")[1]
    serial = task1_result[0].result["get_facts"]["serial_number"]
    platform = task1_result[0].result["get_facts"]["vendor"]
Support APIs and Functions
Now that we have the device serial number and model, we can utilize the support APIs to get any other relevant information. When I initially started getting my thoughts into code, the script started getting rather long. Too long for the actual process I was implementing. I eventually split out the API calls to functions within the “tools.py” file. Remember all those imports? I’ll go over one that sets the credentials (thanks Kirk Byers) and one that interacts with the support APIs. The support APIs all follow the same general flow.
I was having a bit of trouble elegantly setting the device username and password without being in any file. I eventually saw a simple function by Kirk, one of the creators of Nornir.
info.py main
def main():
    """Used to run all the things"""
    norn = InitNornir(config_file="config/config.yaml")
    nornir_set_creds(norn)
    norn.run(task=all_the_things)
# Nornir is initialized as "norn"
# The "norn" object is then passed into the nornir_set_creds function
The version I went with will look for environment variables to be set, you could set this to prompt as well but I got tired of typing.
Setting Credentials
def nornir_set_creds(norn, username=None, password=None):
    """
    Handler so credentials are not stored in cleartext.
    Thank you Kirk!
    """
    if not username:
        username = os.environ.get("NORNIR_USER")
    if not password:
        password = os.environ.get("NORNIR_PASS")

    for host_obj in norn.inventory.hosts.values():
        host_obj.username = username
        host_obj.password = password
I’ll do my best to breakdown the most involved function for the support APIs, EoX! This API returns so much useful information that I made the function just return a dictionary of useful things that can be passed to our CSV. The function takes a serial number as the first parameter and a token as the second. These values will then be passed to the headers of the API call as well as the URL. I run a simple check to see if there’s even been an announcement for that serial number. If not, then set all the values to “N/A”. It gets really interesting after the else statement. You probably notice “Dq” all over the place. “Dq”, short for dictionary query, allows you to query a dictionary in really useful ways. This tool comes from the popular Genie library. In all honesty, I just really wanted to play with it! It really does make finding relevant information in a dictionary a lot shorter. I’ll give you an example after the script.
eox function
def eox(serial: str, token: str):
    """Returns all eox information and replacement option from serial number"""
    device = {}
    headers = {"Authorization": f"Bearer {token}"}
    url = f"https://api.cisco.com/supporttools/eox/rest/5/EOXBySerialNumber/1/{serial}"
    req = requests.request("GET", url, headers=headers)
    content = req.json()
    if content["EOXRecord"][0]["EOXExternalAnnouncementDate"]["value"] == "":
        device["eos"] = "N/A"
        device["eosm"] = "N/A"
        device["ldos"] = "N/A"
        device["eocr"] = "N/A"
        device["replacement"] = "N/A"
    else:
        device["eos"] = Dq(content).contains("EndOfSaleDate").get_values("value", 0)
        device["eosm"] = (
            Dq(content).contains("EndOfSWMaintenanceReleases").get_values("value", 0)
        )
        device["ldos"] = (
            Dq(content).contains("LastDateOfSupport").get_values("value", 0)
        )
        device["eocr"] = (
            Dq(content).contains("EndOfServiceContractRenewal").get_values("value", 0)
        )
        device["replacement"] = (
            Dq(content)
            .contains("MigrationProductId")
            .get_values("MigrationProductId", 0)
        )
    return device
Dq Example
Lets say we had the following dictionary to parse through. Our goal is to get the state value of the “10.10.10.10” OSPF neighbor.
Example dictionary
>>> device = {
...     "router": {
...         "ospf": {
...             "neighbors": [
...                 {
...                     "10.10.10.10": {
...                         "state": "up"
...                     }
...                 },
...                 {
...                     "20.20.20.20": {
...                         "state": "down"
...                     }
...                 }
...             ]
...         }
...     }
... }
>>> device["router"]["ospf"]["neighbors"][0]["10.10.10.10"]["state"]
'up'
What you see above is one way of doing it. Mind you, in my example this dictionary is only going so many levels deep. Imagine if you were going down a deeply nested dictionary. Below is how you would do the same using Dq.
Dq Example
>>> Dq(device).contains("10.10.10.10").get_values("state")
['up']
>>> # Notice that Dq returns a list, below is how to get only the string
>>> Dq(device).contains("10.10.10.10").get_values("state", 0)
'up'
Send Data to CSV
Now that we execute all of our functions to hit the support APIs, we have all the information we need to build our CSV. At the top we are setting variables to the result of what is returned from our functions. Some functions only require a serial, like calculating the manufacture year, and others require a serial number and token. After that we use the CSV library to write all the data to the file we created earlier, in this call we are opening the file in append mode with the mode=’a' set.
info.py snippet
    manu_year = manu_year_cisco(serial)
    base_pid = product_info(serial, my_token)
    upgrade = software_release(base_pid, my_token)
    my_eox = eox(serial, my_token)

    with open("device_info.csv", mode="a", encoding="utf-8") as myfile:
        write = csv.DictWriter(myfile, fieldnames=fieldnames)
        write.writerow(
            {
                "Name": name,
                "Model": model,
                "Current SW": version,
                "Serial": serial,
                "Platform": platform,
                "Manufacture Year": manu_year,
                "Base_PID": base_pid,
                "Recommended SW": upgrade,
                "EoS": my_eox["eos"],
                "EoSM": my_eox["eosm"],
                "LDoS": my_eox["ldos"],
                "EoCR": my_eox["eocr"],
                "Replacement": my_eox["replacement"],
            }
        )
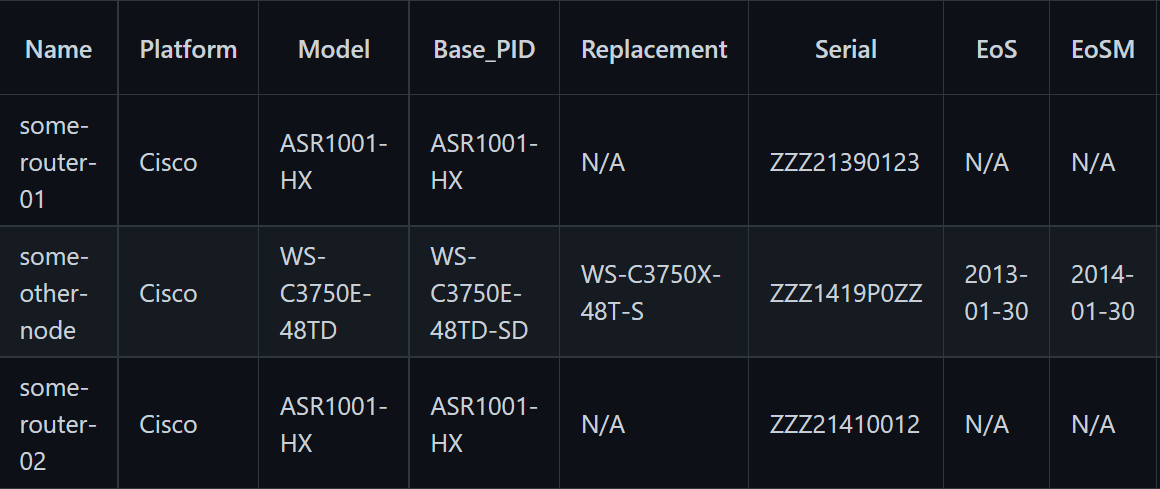
Example CSV
Below is a snip from the CSV example in the repo. If you want to test this out, feel free to clone down the repository and modify your hosts file.
Outro and Links
Thank you all for reading this far! This was a really fun tool to create and allowed me to learn a bit about the support APIs, working with CSVs (with Python), and using Dq! I hope you found this even a bit useful. Something that could be a possibility with a script like this is populating a tool like Netbox!