18 minutes
Static website with Pulumi, YAML, MkDocs, GCP, and CI/CD
Introduction
A few weeks ago, a co-worker asked the team if there was a way to convert a set of Markdown files produced from the AVD Ansible Collection to nice HTML. I then created a simple GitHub Repo that explored various ways to build HTML from Markdown. That repository is combined with the example we’ll walk through in this blog.
I then went down the rabbit hole of getting a static site deployed in the various Clouds. If you look through the old commits, you can see the site is also deployed in Azure using a static web app. By the time you read this, that link may or may not be active. Although, it’s using the free tier, I’ll probably leave it up.
I’ve used GCP to take advantage of the private container registry to push up some images. I wanted to challenge myself with deploying the static site in GCP (and learn a bit about GCP along the way). So I decided to make it harder (or easier?) on myself and leverage Pulumi to deploy the infrastructure..
What is Pulumi
I’ve written about Pulumi in the past on Packet Pushers (read it!), so I won’t go into deep detail about it. But, in summary, it allows us to deploy infrastructure to the cloud using various programming languages (TypeScript, Python, Go, YAML). So, for example, if the team is very comfortable working with Go or Python, we can maintain those skills and use them to provision our cloud infrastructure. If you want to follow along, install Pulumi locally and create an account for their backend service.
curl -fsSL https://get.pulumi.com | sh
pulumi login
Pulumi & YAML
Did you see YAML in that list earlier? What the heck!? Pulumi recently (wow, I just checked, and it was back in May) announced the support for YAML as another option to deploy infrastructure. Once again, hating myself, I decided to use YAML as the language of choice for this example (I’ve used Python in the past).
Static sites
Wow, that was a long intro, and it’s still going. The original question was, “we have a bunch of Markdown, and we want this converted to HTML.” I’ve been using MkDocs heavily in the last few months, so that’s what I’ll use in this example. Please note there are a lot of static site generators (SSG) out there. For example, this blog is created with Hugo, but others such as Jekyll, Gatsby, etc. will work just fine.
MkDocs
MkDocs is so easy to use that it’s really grown on me these last few months. If you want to follow along, either clone the repository linked at the end or start fresh. We can begin by creating a Python virtual environment and installing a few items.
pre-commit
mkdocs
mkdocs-material
mkdocs-include-dir-to-nav
python3 -m venv venv
source venv/bin/activate
pip install -r requirements.txt
Pre-commit will be explained later on. The other installs will leverage MkDocs, the fantastic Material theme, and a simple MkDocs plugin for navigation (optional). Great, now that we have that installed, we can review our mkdocs.yaml file. This is used to configure the various settings for our static site.
site_name: Fabric Docs

# Configuration
use_directory_urls: false
site_url: ""
edit_uri: ""
docs_dir: avd-project
theme:
  name: material
  palette:
    - media: "(prefers-color-scheme: light)"
      scheme: default
      toggle:
        icon: material/weather-sunny
        name: Switch to dark mode
    - media: "(prefers-color-scheme: dark)"
      scheme: slate
      toggle:
        icon: material/weather-night
        name: Switch to light mode
plugins:
  - include_dir_to_nav:
  - search
extra_css:
  - stylesheets/extra.css
extra_javascript:
  - https://unpkg.com/tablesort@5.3.0/dist/tablesort.min.js
  - stylesheets/tables.js
nav:
  - Home: README.md
  - documentation
  - reports
docs_dir: Points to a directory where our documents are stored and will be referenced from (default isdocs).theme.name: This tells MkDocs that we will be leveraging the material theme.plugins: Any additional plugins we would like enabled. If you did not installmkdocs-include-dir-to-navthat can be disabled. I am leveraging to point mkdocs to folders withindocs_dirto build the navigation tree. Instead of specifying them one by one.extra_css: Not required, adds different styling from the default.extra_javascript: Again, not required, used here to sort generated tables.nav: This is used to build all the navigation for our site.
Excellent, clear as mud. We can “serve” the documents to get a live view as we modify them.
juliopdx in static-hosting-example on main [✘!?] via dev via 🐍 took 6s
❯ mkdocs serve
INFO     -  Building documentation...
INFO     -  Cleaning site directory
INFO     -  Documentation built in 0.84 seconds
INFO     -  [00:00:50] Watching paths for changes: 'avd-project', 'mkdocs.yml'
INFO     -  [00:00:50] Serving on http://127.0.0.1:8000/
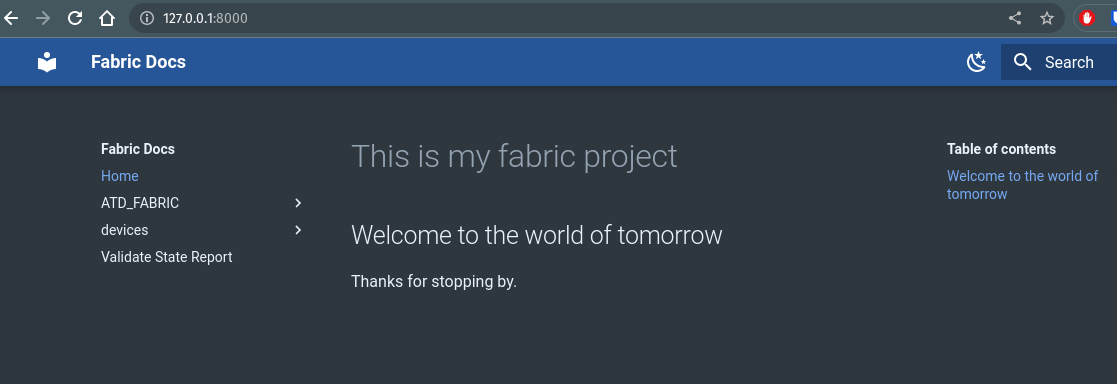
If we open that in the browser, we will see something like the following.
Great, we have a simple static site ready for deployment in the cloud. If you run mkdocs build, mkdocs will package your static site in a new folder called site.
juliopdx in static-hosting-example on main [✘!?] via dev via 🐍 took 12m32s
❯ mkdocs build
INFO     -  Cleaning site directory
INFO     -  Building documentation to directory: /home/juliopdx/repos/static-hosting-example/site
INFO     -  Documentation built in 0.67 seconds

juliopdx in static-hosting-example on main [✘!?] via dev via 🐍
❯
Deploying the static site to GCP
On the first build of this site, I used the official documentation. That was a great exercise and showed how all the various resources are connected. But this example will show the steps to deploy this with Pulumi and YAML. If you are following along, you will need to install the Google Cloud SDK and authorize with a user account.
Pulumi
If you are using this repository, you can edit a few values and run pulumi up. Create a directory and start a new Pulumi project if you are creating your own project.
mkdir quickstart && cd quickstart && pulumi new gcp-yaml
Please note, you will need to create a GCP project and enable the Google Compute API in your project to create resources.
Bucket and rule for the public
This example will leverage a storage bucket to store our site files.
name: static-hosting-example
description: Static hosting on GCP
runtime: yaml
resources:
  # Create storage bucket
  web-bucket:
    type: gcp:storage:Bucket
    properties:
      website:
        mainPageSuffix: index.html
        notFoundPage: 404.html
      location: US
      uniformBucketLevelAccess: true
      forceDestroy: true

  # Enable public access to view site
  web-bucket-binding:
    type: gcp:storage:BucketIAMBinding
    properties:
      bucket: ${web-bucket.name}
      role: "roles/storage.objectViewer"
      members: ["allUsers"]
At the root, we have basic information like name, description, and runtime (YAML). We then list out the individual resources as dictionaries. For example, the web-bucket is of type gcp:storage:Bucket. I thought this was interesting syntax. In a programming language, you may see this as gcp.storage.Bucket. It essentially maps to what function will be executed to create the particular resource.
We then fill in the properties key with our unique configuration. We could also add a name key to hardcode what name we want to give a resource. I left this to Pulumi to name from the top-level key. For example, web-bucket will actually be named something crazy like web-bucket12345445.
We specify two essential files for our storage bucket, one for our main page and another when something is not found. I added the forceDestroy property so that I could destroy the bucket while testing. I believe if something is in the bucket and forceDestroy is not set, it will not delete the bucket.
Apologies that this section is so long, but it’s important to understand how Pulumi works. The second resource is just setting an access rule to make our files viewable to the public. But notice, to pass in what bucket this rule should be associated with, we use ${web-bucket.name}. This is an available parameter from our storage bucket resource. You can run pulumi up -y to create the resources.
Load balancer and SSL certs
The goal of building this was to make it secure. Users get weird when they browse a site with the famous “Your connection is not private, invalid SSL cert” error. The note below is directly from the guide.
Cloud Storage doesn’t support custom domains with HTTPS on its own, so you also need to set up an SSL certificate attached to an HTTPS load balancer to serve your website through HTTPS.
Okay, that sounds super easy…
Load balancer and SSL certificate
We’ll need a static IP for future assignment to our global forwarding rules (also used for our DNS records).
name: static-hosting-example
description: Static hosting on GCP
runtime: yaml
resources:
# ...
  # Global address
  webglobaladdress:
    type: gcp:compute:GlobalAddress
I don’t want to manage SSL certs, so I’ll just let GCP handle that. I then list any domains I plan to leverage with this certificate.
# ...
  # GCP managed cert with list of domains
  managedcert:
    type: gcp:compute:ManagedSslCertificate
    properties:
      managed:
        domains:
        - juliopdx.org
        - www.juliopdx.org
The backend service is interesting. First, we enable CDN (Content Delivery Network) since we want users to get quick and close delivery of our content. Although I’m guessing GCP gets you with the pricing here, I would plan ahead. I’m currently leveraging the free account on GCP for this deployment, which will be short-lived. We then associate our web-bucket where the site will be stored.
  # backend service leveraging our storage bucket
  sitebackend:
    type: gcp:compute:BackendBucket
    properties:
      description: Contains a sweet site
      bucketName: ${web-bucket.name}
      enableCdn: true
      cdnPolicy:
        cacheMode: CACHE_ALL_STATIC
        clientTtl: 300
        defaultTtl: 300
        maxTtl: 1800
From my research, it seems like URLmaps can get really complex. URLMaps route requests to backend services (sitebackend seen above). We don’t have any defined, so it will just use the default. The default will route all the things to our sitebackend.
  # Basic URL map pointing to backend
  webservicepaths:
    type: gcp:compute:URLMap
    properties:
      defaultService: ${sitebackend.id}
The HTTPS proxy ties everything together. At this point, we associate our URLMap and newly managed SSL certificate. Our global forwarding rule can use the proxy to route incoming HTTPS requests to our webservicepaths URLMap.
  # HTTP proxy leveraging managed cert
  httpsproxy:
    type: gcp:compute:TargetHttpsProxy
    properties:
      urlMap: ${webservicepaths.selfLink}
      sslCertificates:
      - ${managedcert.id}
We tie the httpsproxy and webglobaladdres with our global forwarding rule. The loadBalancingScheme: EXTERNAL_MANAGED makes this a fancy load balancer vs. the classic one. You will probably get more features with the new one.
  # Forwarding rule pointing to HTTPS proxy
  defaultglobalforwardingrule:
    type: gcp:compute:GlobalForwardingRule
    properties:
      target: ${httpsproxy.id}
      portRange: 443
      loadBalancingScheme: EXTERNAL_MANAGED
      ipAddress: ${webglobaladdress.id}
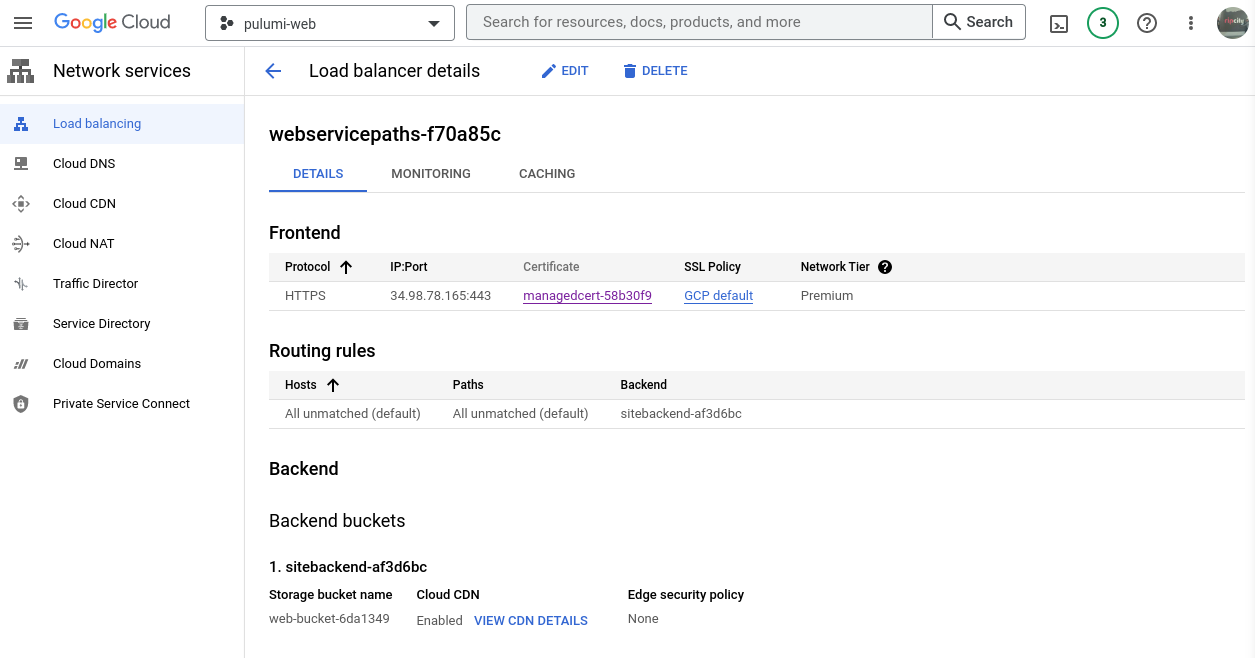
You can run pulumi up -y to create all the resources. Please make sure to update the domain names for the certificate with your information. Below is an example from the GCP console and the Load Balancer we just created.
HTTP to HTTPS redirect
We’re almost done with the deployment. One other piece is directing users to HTTPS when they try to hit our site on port 80 or HTTP. The build-out is similar to our initial load balancer without the certificate or SSL policy.
  # HTTP to HTTPS redirect
  redirecturlmap:
    type: gcp:compute:URLMap
    properties:
      defaultUrlRedirect:
        httpsRedirect: true
        stripQuery: false

  redirecttargethttpproxy:
    type: gcp:compute:TargetHttpProxy
    properties:
      urlMap: ${redirecturlmap.id}

  redirectglobalforwardingrule:
    type: gcp:compute:GlobalForwardingRule
    properties:
      loadBalancingScheme: EXTERNAL_MANAGED
      target: ${redirecttargethttpproxy.id}
      portRange: 80
      ipAddress: ${webglobaladdress.id}
This diagram does a great job of summing up this workflow and our initial load balancer.

Note: Pulumi also has this neat feature called outputs. We can save the output and use it later on in other programs or within the command line. Example in a moment.
Connecting domain to load balancer
Now that everything is created, we can update our DNS records to point to our public address. We can either use the console or the command line. The load balancer image shown earlier also reveals the public address.
juliopdx in static-hosting-example on main [!⇡] via dev via 🐍 took 2s
❯ gcloud config set project pulumi-web
Updated property [core/project].

juliopdx in static-hosting-example on main [!⇡] via dev via 🐍
❯ gcloud compute addresses list
NAME                      ADDRESS/RANGE  TYPE      PURPOSE  NETWORK  REGION  SUBNET  STATUS
webglobaladdress-e33548f  34.98.78.165   EXTERNAL                                    IN_USE
I wanted to use www.juliopdx.org and juliopdx.org. I created two “A” records that matched my setup.

Uploading files using gsutil
I couldn’t figure out how to send a folder using the Pulumi YAML provider. Please send me a message if you know how to do that. After some research, I found this great post by Mickael Vieira, where they use Hugo and GitHub actions to deploy a static site. This led me to gsutil. It’s a Python application that lets you interact with GCP storage from the command line. If you already ran mkdocs build, you should have a site folder in your directory. The following command can be used to send the files from a particular directory.
gsutil -m rsync -d -c -r site gs://<some bucket name>
From Mickael’s blog:
mto perform parallel synchronization;rto synchronize the directories and subdirectories recursively;cto use files’ checksum instead of their modification time to avoid sending all files during each deployment;dto delete the files that are no longer necessary.
We can use the console to find out what the name of our bucket is, or we can use a Pulumi Output. For example, the end of our Pulumi.yaml file has this line.
outputs:
    # Export the DNS name of the bucket
    bucketName: ${web-bucket.url}
We can leverage this in our gsutil command.
gsutil -m rsync -d -c -r site $(pulumi stack output bucketName)
juliopdx in static-hosting-example on main [!⇡] via dev via 🐍
❯ gsutil -m rsync -d -c -r site $(pulumi stack output bucketName)
Building synchronization state...
Starting synchronization...
Copying file://site/sitemap.xml [Content-Type=application/xml]...
Copying file://site/sitemap.xml.gz [Content-Type=application/xml]...
- [2/2 files][  1.0 KiB/  1.0 KiB] 100% Done
Operation completed over 2 objects/1.0 KiB.
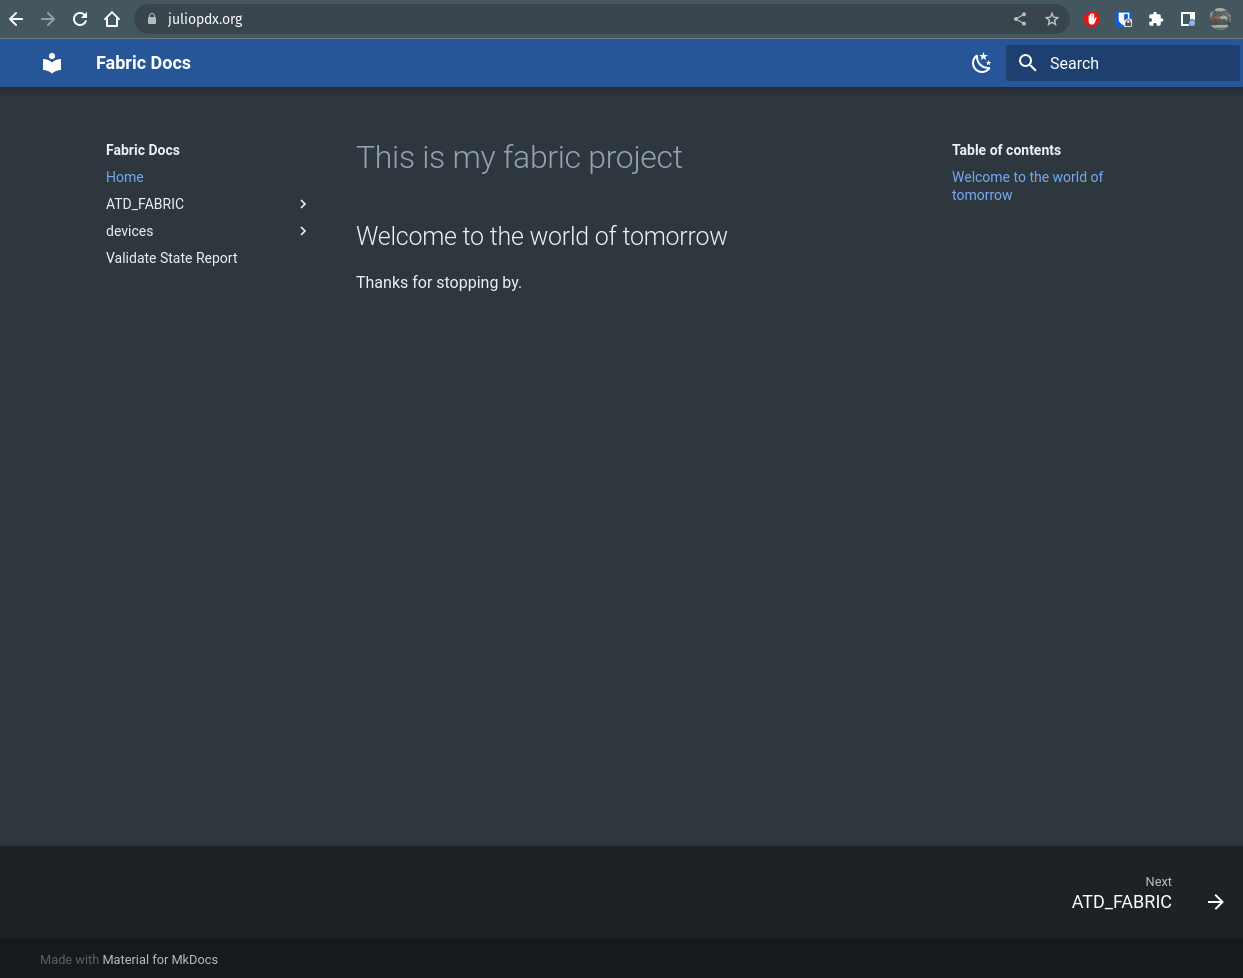
After some time for the certificate to be created and DNS to propagate, you should see something like this. It’s beautiful.
Thats great and all, but lets talk CI/CD with documentation
So far, we have built up the infrastructure and the site content with local development, but we can incorporate CI/CD into our documentation. Contributors would still create content locally, but that content would then get pushed up to our Git repository to be checked before going out to production. In the following sections, I’ll explain some fantastic tools and examples of moving some of these steps to GitHub actions.
pre-commit
Pre-commit is pretty awesome. You can supply a series of hooks that can then be used to lint your various programming languages, fix common file issues (trailing whitespace), or in our case, fix our documentation written in Markdown. If you followed along, you should have pre-commit installed.
pip install pre-commit
Pre-commit relies on a .pre-commit-config.yaml file at the root of your project to know what linters or hooks to run.
# See https://pre-commit.com for more information
# See https://pre-commit.com/hooks.html for more hooks
repos:
  - repo: https://github.com/pre-commit/pre-commit-hooks
    rev: v2.4.0
    hooks:
      - id: trailing-whitespace
        exclude: ansible_collections/arista/avd/molecule
      - id: end-of-file-fixer
        exclude_types: [svg, json]
You can extend this as much as you want or add more hooks related to your project. To get started, run the following command.
juliopdx in static-hosting-example on main [!⇡] via  dev via 🐍
❯ pre-commit install --install-hooks
pre-commit installed at .git/hooks/pre-commit
[INFO] Initializing environment for https://github.com/pre-commit/pre-commit-hooks.
[INFO] Installing environment for https://github.com/pre-commit/pre-commit-hooks.
[INFO] Once installed this environment will be reused.
[INFO] This may take a few minutes...
[INFO] Once installed this environment will be reused.
[INFO] This may take a few minutes...
We can then check our code base for any issues.
❯ pre-commit run --all-files
Trim Trailing Whitespace.................................................Passed
Fix End of Files.........................................................Passed
Great, everything passed. What about with an error? I removed the extra new line in Pulumi.yaml, which we want.
❯ pre-commit run --all-files
Trim Trailing Whitespace.................................................Passed
Fix End of Files.........................................................Failed
- hook id: end-of-file-fixer
- exit code: 1
- files were modified by this hook

Fixing Pulumi.yaml
Pre-commit is much more powerful than I’m showing here, but it’s good for demonstration.
Markdownlint
We can also add Markdownlint to our pre-commit workflow.
# ...
  - repo: https://github.com/igorshubovych/markdownlint-cli
    rev: v0.32.1
    hooks:
      - id: markdownlint
        name: Check for Linting errors on MarkDown files
        args:
          - --config=.github/.markdownlint.yaml
          - --ignore-path=.github/.markdownlintignore
          - --fix
I will only go into some detail since this is already so long. First, I created two files in the .github directory. One that points to the rules we want to enable or disable. Check out the repo if you would like to leverage them. I then ignore specific directories for files that may be created by automation. This is similar to a .gitignore file but for Markdown files. We can then run pre-commit again.
I’ll add an error by adding another H1 heading in the README file.
# Static site example

Simple workflows to view and build static site stuff.

# Test heading

## Getting started
❯ pre-commit run --all-files
Trim Trailing Whitespace.................................................Passed
Fix End of Files.........................................................Passed
Check for Linting errors on MarkDown files...............................Failed
- hook id: markdownlint
- exit code: 1

README.md:5 MD025/single-title/single-h1 Multiple top-level headings in the same document [Context: "# Test heading"]
Usage: markdownlint [options] <files|directories|globs>
In the case of Markdownlint, it will try to fix some errors, but it cant assume everything. The heading is not automatically removed for us, but some mistakes will be corrected. I’ll remove the duplicate H1 heading and run pre-commit again.
❯ pre-commit run --all-files
Trim Trailing Whitespace.................................................Passed
Fix End of Files.........................................................Passed
Check for Linting errors on MarkDown files...............................Passed
For more inforamtion, check out markdownlint and markdown-cli.
Vale on the command line
Vale is a command line tool that can be used to check prose (your writing style). It does this based on a series of rules. The user can create these rules, or you can leverage pre-made styles. For example, Googles developer style guide (errata-ai version of the style guide). To use Vale, you must install the binary.
I’ve found the easiest way to get Vale running is through Homebrew.
brew install vale
Like most things, we need to provide Vale a configuration. This is done by Vale reading the .vale.ini file at the root of our project.
StylesPath = .github/styles
MinAlertLevel = error # suggestion, warning or error

# Only Markdown; change to whatever you're using.
[*.{md}]
# List of styles to load.
BasedOnStyles = Google
I have the Google style in my repository in that StylesPath. I then chose the alert level of error. Feel free to play with the alert levels and the Google style rules that you agree or don’t agree with. My good friend, Daniel Teycheney, has an excellent blog post on using Vale. Check it out for more details.
I’ll run Vale against one file with no errors.
❯ vale README.md
✔ 0 errors, 0 warnings and 0 suggestions in 1 file.
Now I’ll introduce one error: Google hates exclamation marks in headings. Maybe hate is a strong word.
# Static site example!

Simple workflows to view and build static site stuff.
❯ vale README.md

 README.md
 1:21  error  Don't use exclamation points    Google.Exclamation
              in text.

✖ 1 error, 0 warnings and 0 suggestions in 1 file.
I think that’s slick. With tools like these, you can ensure a consistent style and quality of your blog, documentation, or whatever else you’re building. But the fun doesn’t stop there. We can take all the tools mentioned and move them to GitHub actions.
GitHub actions
I have the following files in my .github/workflows/ directory.
❯ tree .github/workflows
.github/workflows
├── pr-manage.yml
└── static-web-app.yml

0 directories, 2 files
pr-manage.yml will be used for any pull requests. This workflow can run pre-commit, Vale, and Pulumi preview.
---

name: "Doc testing"

on:
  # For a pull_request event, only branches and tags on the base are evaluated.
  push:
    branches-ignore:
      - main   # excludes main

jobs:
  pre_commit:
    name: Run pre-commit validation hooks
    runs-on: ubuntu-latest
    steps:
    - uses: actions/checkout@v3
    - uses: actions/setup-python@v3
    - uses: pre-commit/action@v3.0.0

  vale:
    name: runner / vale
    runs-on: ubuntu-latest
    steps:
      - uses: actions/checkout@v2
      - uses: errata-ai/vale-action@reviewdog
        env:
          # Required, set by GitHub actions automatically:
          # https://docs.github.com/en/actions/security-guides/automatic-token-authentication#about-the-github_token-secret
          GITHUB_TOKEN: ${{secrets.GITHUB_TOKEN}}
        with:
          files: avd-project/
          reporter: github-check

  pulumi-gcp-preview:
    name: runner / pulumi
    runs-on: ubuntu-latest
    steps:
      - uses: actions/checkout@v2
      ###### GCP connect ######
      - name: gcp auth
        uses: 'google-github-actions/auth@v0'
        with:
          credentials_json: '${{ secrets.GCP_CREDENTIALS }}'
      - name: Set up Cloud SDK
        uses: 'google-github-actions/setup-gcloud@v0'
      - name: pulumi preview
        uses: pulumi/actions@v3
        with:
          command: preview
          stack-name: dev
        env:
          PULUMI_ACCESS_TOKEN: ${{ secrets.PULUMI_ACCESS_TOKEN }}
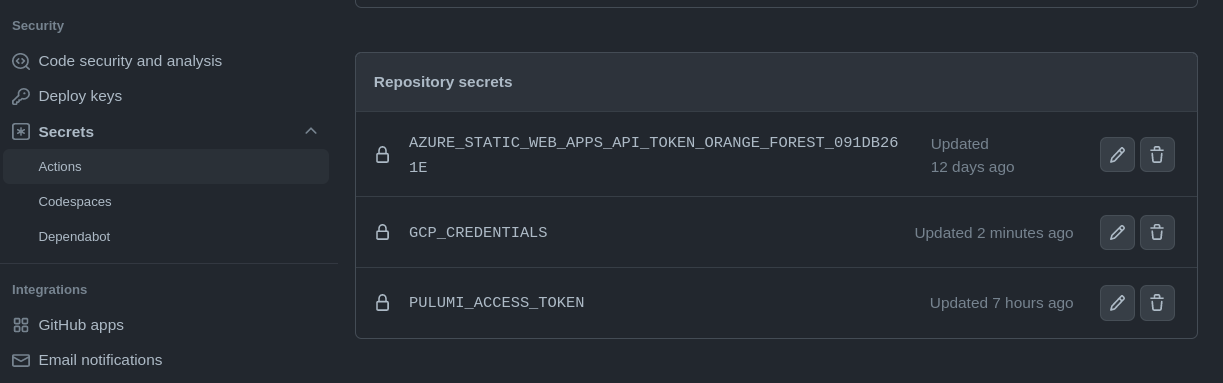
A lot is going on, but two secrets must be set to run this workflow. First, you need to create a service account user in GCP and add a new key in the form of JSON. This can then be added to repository secrets. You will also need to create a token in the Pulumi backend. This is a great guide.
I’ll create a branch and push this up with some description added to one of our resources.
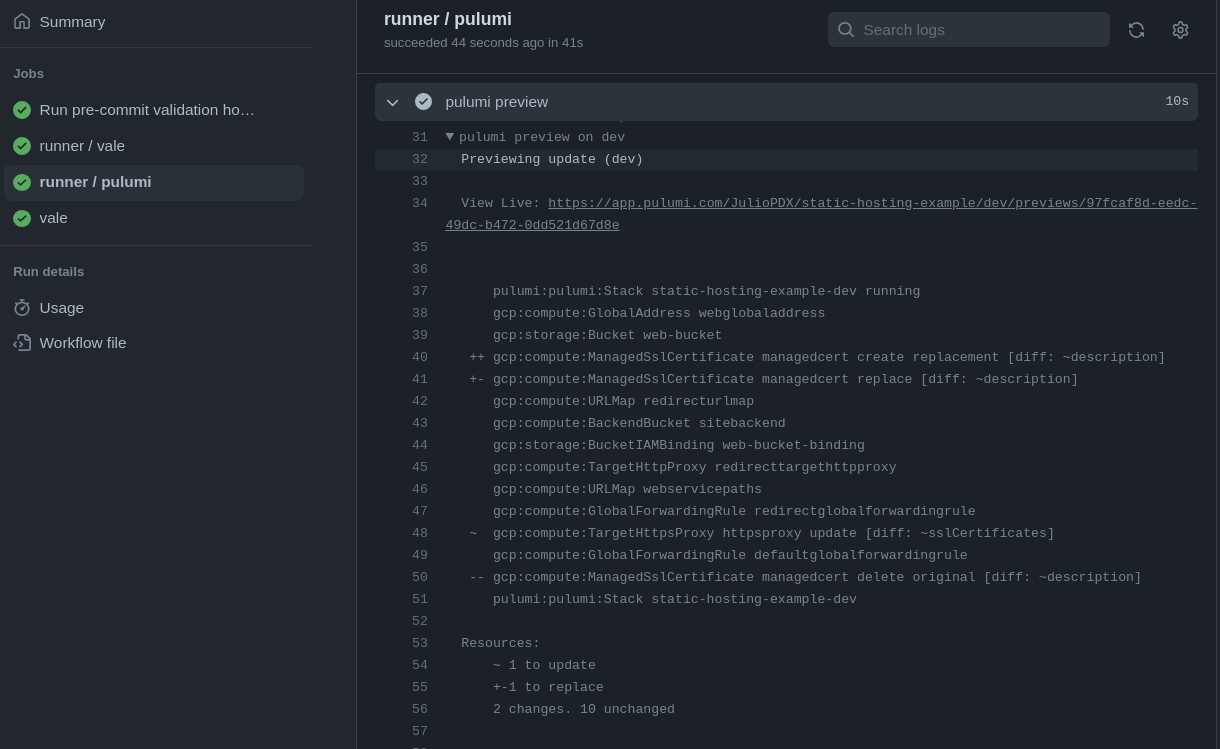
Looking closely, you can see we have an update for the description on the ManagedSslCertificate resource.
Push on main
Now that it is working, I’ll run a pull request and merge these changes to our main branch. Then, instead of a preview, Pulumi will perform the changes.
name: GCP & Pulumi static web app

on:
  push:
    branches:
      - main


jobs:
  build_and_deploy_job:
    runs-on: ubuntu-latest
    name: Build and Deploy Job
    steps:
      - uses: actions/checkout@v2
        with:
          submodules: true

      - uses: actions/setup-python@v2
        with:
          python-version: 3.x

      - run: pip install -r requirements.txt
      - run: mkdocs build

      ###### GCP push portion ######
      - name: auth
        uses: 'google-github-actions/auth@v0'
        with:
          credentials_json: '${{ secrets.GCP_CREDENTIALS }}'

      - name: Set up Cloud SDK
        uses: 'google-github-actions/setup-gcloud@v0'

      - name: Use gcloud CLI
        run: 'gcloud info'

      - name: deploy infrastructure pulumi
        uses: pulumi/actions@v3
        with:
          command: up
          stack-name: dev
        env:
          PULUMI_ACCESS_TOKEN: ${{ secrets.PULUMI_ACCESS_TOKEN }}

      - name: Push updated files to bucket
        run: gsutil -m rsync -d -c -r site $(pulumi stack output bucketName)
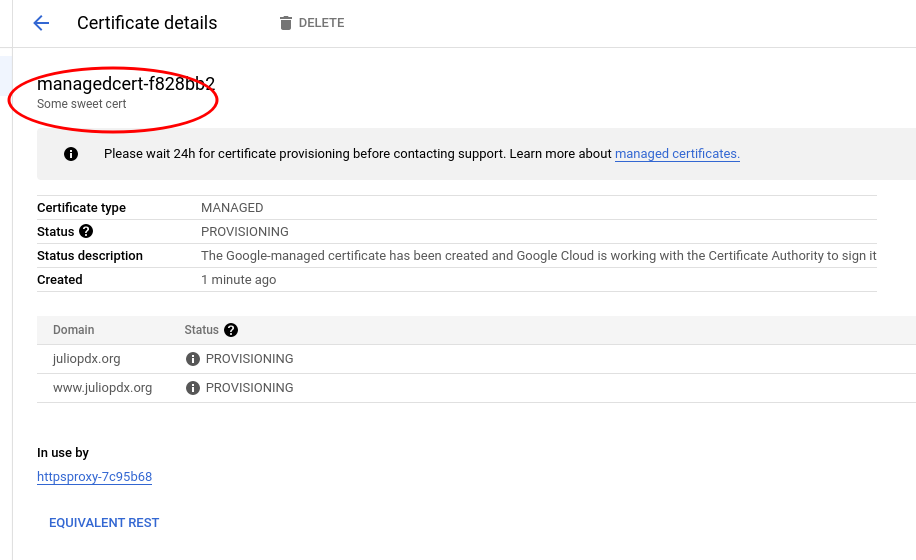
We’ll run through the MkDocs steps to build our site. We then login to GCP using our secrets and run pulumi up. Once the infrastructure is set, we run gsutil to update the files if required. It seems that at the time of this writing, the set-ouput is deprecated, so I can’t show the difference in the GitHub actions workflow. Check out the job run and the issue. We can see the updates on the console.
  # GCP managed cert with list of domains
  managedcert:
    type: gcp:compute:ManagedSslCertificate
    properties:
      description: Some sweet cert
      managed:
        domains:
        - juliopdx.org
        - www.juliopdx.org
Final thoughts and links
Wow, that was a lot of information. I hope you enjoyed the read and hopefully learned something along the way. Thank you for reading this far. As always, it really means a lot. I provided links where I may not have been as clear. Please check them out; they are great resources. Like anything I write, what I show here is just a subset of what these tools can do. Best of luck and happy labbing and learning.