10 minutes
Codespaces for Network Engineers and Educators
Introduction
Can you believe it’s been almost a year since my last blog? It’s incredible how fast time flies. Thank you all for continuing to read the blog and sharing it with engineers in the community. I can’t thank you enough for all the support and encouragement I’ve received on this journey.
This blog is going to take a bit of a turn. I usually write in the form of a tool I have used or been presented with and think, “This is incredible; more people should know about it.” My other perspective is, “Can I explain this thing in a somewhat more consumable way.” This stems from the idea that to really challenge your understanding, teach.
Teaching leads us to the idea behind this blog. I was recently at AutoCon 2 by Network Automation Forum (great event) and I met an interesting individual from New Mexico. I won’t say their name publicly, but let’s call them Bob for this blog. Bob is an instructor at a college and teaches future engineers about all things networking. Their students go through Introductory courses (think CCNA level). However, Bob has an interesting challenge: they want their students to continue learning advanced networking concepts. Bob has a tight budget (if any) and would like to avoid managing a fleet of resources to manage students' lab environments.
You all know Containerlab was at the forefront of my mind. Containerlab and a concept a colleague of mine has been working on to build reproducible labs with GitHub Codespaces got my brain spinning on a possible solution for Bob and their students.
The Idea Behind Codespaces
Some of you may be wondering, “What a Codespace?” Think of a Codespace as an environment running on GitHub’s infrastructure. Another way to look at it is like a portable development environment that can be accessed by a web browser. In its most basic form, all you need to access a Codespace is a GitHub account (free), computer, and internet access. Please see the official documentation for more information. The image below was inspired by the official documentation. In this example, our Codespace would be the box highlighted in red.
Codespaces for Network Engineers and Educators
I started pondering what a Network Engineer and Educator would need in a Codespace. We would definitely need network nodes in the environment. Reading about concepts is excellent, but seeing them come to life is even more powerful. We should also make the environment easy to use for anyone at any stage of their journey. Because styling is life, it must be pretty. Lastly, we need to be able to present the information to students in something other than a README file (even though I love a good README).
Building a Codespace
Below is an example of our Codespaces (link at the bottom of the blog) project. I’ll go over most of the files to give you an idea of how to build an environment like this.
> tree
.
├── .devcontainer
│   ├── devcontainer.json
│   └── Dockerfile
│   └── postCreate.sh
├── ne101
│   └── 01-routing-ospf
│       └── lesson.md
├── startup
│   ├── r1.cfg
│   └── r2.cfg
└── topo.yml
.devcontainer/devcontainer.json
The .devcontainer directory will host most of our workflow for this environment. For starters, we have a devcontainer.json file. If your project didn’t require a lot of extra tooling (maybe a Python project), the file could look something like the following.
// For format details, see https://aka.ms/devcontainer.json. For config options, see the
{
  "name": "Python 3",
  "image": "mcr.microsoft.com/devcontainers/python:0-3.11-bullseye",
}
The example above is using a pre-built container image hosted by Microsoft. In this case, the project is leveraging Python 3.11. The example below provides a more in-depth and realistic view of a .devcontainer.json file.
{
    "build": { "dockerfile": "Dockerfile" },
    "hostRequirements": {
        "cpus": 4,
        "memory": "16gb",
        "storage": "32gb"
    },
    "containerEnv": {
        "ARISTA_TOKEN": "${localEnv:ARTOKEN}",
        "CEOS_LAB_VERSION": "4.32.2.1F"
    },
    "features": {
        "ghcr.io/devcontainers/features/github-cli:1": {},
        "ghcr.io/devcontainers/features/docker-in-docker:2": {}
    },
    "secrets": {
        "ARTOKEN": {
            "description": "token to auto-download EOS images from arista.com."
        }
    },
    "customizations": {
        "vscode": {
            "extensions": [
                "catppuccin.catppuccin-vsc",
                "catppuccin.catppuccin-vsc-icons",
                "fabiospampinato.vscode-terminals",
                "marp-team.marp-vscode"
            ]
        }
    },
    "postCreateCommand": "postCreate.sh",
    "postStartCommand": "sudo clab deploy -t topo.yml --reconfigure"
}
build and a Dockerfile
The first portion of the JSON file calls out a build step. We are not using a pre-built container image to load our environment. We will load a Dockerfile locally for our project to spin up the environment and install the required tooling. We could, in theory, build our container image outside of this workflow and call it with the image key you saw earlier. Below is a quick view of our Dockerfile.
FROM mcr.microsoft.com/devcontainers/base:ubuntu

ARG CEOS_LAB_VERSION_ARG

ENV CEOS_LAB_VERSION=${CEOS_LAB_VERSION_ARG}

# install some basic tools inside the container
RUN apt-get update \
    && apt-get install -y --no-install-recommends \
    sshpass \
    iputils-ping \
    htop \
    python3 \
    python3-pip \
    && rm -rf /var/lib/apt/lists/* \
    && rm -Rf /usr/share/doc && rm -Rf /usr/share/man \
    && apt-get clean

# copy postCreate script
COPY ./postCreate.sh /bin/postCreate.sh
RUN chmod +x /bin/postCreate.sh

USER vscode

# install the latest containerlab and eos-downloader
RUN bash -c "$(curl -sL https://get.containerlab.dev)" \
    && pip3 install --user "eos-downloader>=0.10.1"
In summary, this file is performing the following:
- Start FROM the base Ubuntu image hosted by Microsoft
- We use the ARG key to pass data into the build environment (in our case this comes from the
.devcontainer.jsonfile) - We then set an ENV variable that will be available within the container (notice that we pass along the ARG we set earlier)
- We then RUN a set of commands to install basic tooling like ping and Python3.
- We then COPY a file called
postCreate.sh(more on this later) and make it executable - Towards the end, we have one more RUN command; this ensures we have Containerlab and eos-downloader installed in our environment
hostRequirements
When starting a Codespace, you can size it to one of the options given to us by GitHub. The hostRequirements key allows us to set the minimum values required to run this lab. Suppose you don’t have the option to use a larger Codespace. In that case, you may need to contact GitHub to give you access to larger images (still free but uses more free credits per month).
    "hostRequirements": {
        "cpus": 4,
        "memory": "16gb",
        "storage": "32gb"
    },
containerEnv and secrets
I’ll combine these two sections. contanierEnv sets environment variables to which our container will have access. One is used as a token to download our Arista cEOS images. If you would like to leverage the Codespace in this example, please create an account with a business email on arista.com (free). The other variable will be used in a future workflow to specify which image we would like to download.
It’s been brought to my attention that Arista customers who register will get a token to download images. Apologies for the confusion.
    "containerEnv": {
        "ARISTA_TOKEN": "${localEnv:ARTOKEN}",
        "CEOS_LAB_VERSION": "4.32.2.1F"
    },
    "secrets": {
        "ARTOKEN": {
            "description": "token to auto-download EOS images from arista.com."
        }
    },
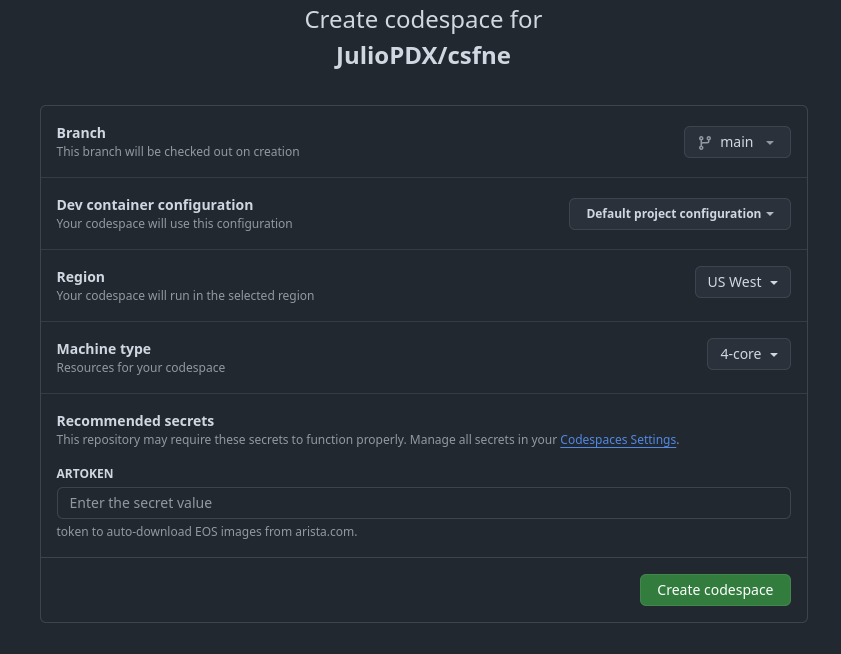
The ARTOKEN secret will be available to our container in future workflows. The screenshot below shows an example before setting any value for ARTOKEN.

features
features is another incredible feature of Codespaces and devcontainers. We can tell our environment what extra features we want to install. Think of these as pre-made scripts that handle the installation for us. We add the GitHub CLI feature to simplify our future workflows. Maybe the students aren’t Git wizards and need a more straightforward interface to interact with Git. We also install the docker-in-docker feature to allow us to work with Containerlab. Features are incredibly powerful; if you want to see a list of features, please see the official documentation.
    "features": {
        "ghcr.io/devcontainers/features/github-cli:1": {},
        "ghcr.io/devcontainers/features/docker-in-docker:2": {}
    },
customizations.vscode.extensions
These extensions allow us to extend the functionality or look of VS Code. I am adding my current favorite theme extension: catppuccin. If you were a University or Company, you could create a custom extension with your own styling. I also load a terminals extension that will give our students the ability to quickly open terminals to the different nodes in the environment. I also install the Marp extension, but more on that later.
    "customizations": {
        "vscode": {
            "extensions": [
                "catppuccin.catppuccin-vsc",
                "catppuccin.catppuccin-vsc-icons",
                "fabiospampinato.vscode-terminals",
                "marp-team.marp-vscode"
            ]
        }
    },
.vscode/settings.json
We’re taking a small break to look at our settings.json file. Again, this can be very deep and complicated, but for this example, we kept it as simple as possible.
{
    "workbench.colorTheme": "Catppuccin Frappé",
    "workbench.iconTheme": "catppuccin-frappe",
    "markdown.marp.themes": [
        "https://raw.githubusercontent.com/mastern2k3/marpit-nord-theme/master/build/nord-theme.css"
    ]
}
Here, we set the theme of our VS Code instance and icon theme. We also set our Marp theme (again, explained in a moment). The final version has a few more Marp themes, but that was more for exploration and testing.
.vscode/terminals.json
Another small break, the code block below shows the configuration of our Terminals extension. We set the extension to not autorun and then defined the terminals as a list of dictionaries. We can then provide basic information like the name, icon, color, and command to run on the new terminal.
{
    "autorun": false,
    "autokill": true,
    "terminals": [
      {
        "name": "r1",
        "description": "r1 view",
        "icon": "code",
        "color": "terminal.ansiBlue",
        "command": "ssh student@r1",
        "recycle": false,
        "open": true,
        "focus": true
      },
      {
        "name": "r2",
        "description": "r2 view",
        "icon": "code",
        "color": "terminal.ansiRed",
        "command": "ssh student@r2",
        "recycle": false,
        "open": true,
        "focus": false
      }
    ]
}
The GIF below shows an example of running 'cmd/ctrl+alt+t' from VS Code to connect to any pre-defined terminal or running Terminals:run to connect to all defined terminals.

postCreateCommand
The following portion will run after the container has finished building. Nothing too fancy; we are using eos-downloader to get a specific version of cEOS and have it run the Docker import step. We then immediately tag the image with ceos:latest.
"postCreateCommand": "postCreate.sh",
#!/usr/bin/env bash

set +e

ardl get eos --image-type cEOS --version ${CEOS_LAB_VERSION} --import-docker
docker tag arista/ceos:${CEOS_LAB_VERSION} ceos:latest
postStartCommand
We made it to the final portion of the Codespace build, how we deployed the lab. This is no surprise, as we are running the Containerlab deploy command to ensure our cEOS nodes are running. We run it with the --reconfigure flag to ensure we have no issues when the Codespace shuts down and turns back on.
The only thing of note here is that we created startup configurations to set management network stuff in a separate VRF and a student user that did not require passwords to connect. Those can be seen in the startup directory.
"postStartCommand": "sudo clab deploy -t topo.yml --reconfigure"
You can see some of the Containerlab output in the GIF above.
Slides with Marp
We are almost there. We now have an environment to learn about networking concepts or even network automation. An instructor needs a tool to present this information. Again, I love a good README, but giving that to a student and telling them “good luck” is going to have a wide range of results.
In comes Marp, Which tags itself as a Markdown Presentation Ecosystem. That sounds fancy, but at its core, it allows us to write presentations in Markdown format. I wrote about a distant relative, slidev, in an earlier blog. For this example, I felt slidev was a bit heavy, and all that I needed to get Marp going was a VS Code extension.
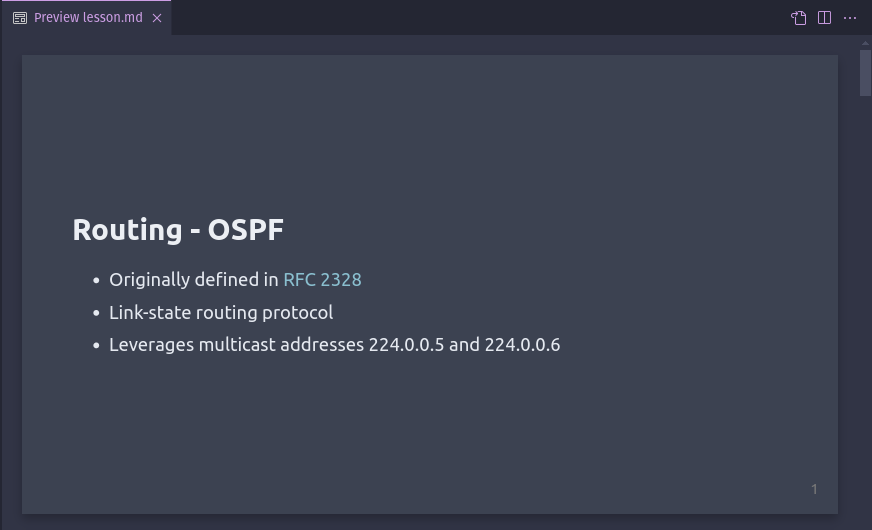
Below is an example of the slides when rendered within the Codespace. To view this presentation, we just hit “preview” on the markdown file like we would any file in VS Code. You can find this presentation in the ne101/01-routing-ospf/lesson.md file. If you started the Codespace, feel free to follow along with the lesson.

Outro and Links
Thank you all for reading this far; it really means a lot. I hope you learned a little bit about Codespaces and that it inspires you to create something beautiful in the future. If you have any feedback or improvements, please reach out. All the best!
