20 minutes
Network CI and Open Source
Introduction
Wow, it’s been a long time since my last blog post. I recently attended the first AutoCon event focusing on network automation. Long story short, it was terrific. Check it out and be on the lookout for the next one. Shortly after AutoCon, two community members sprung up with sweet blog posts. My colleague and friend Dan Hertzberg are resurrecting the blog. The first post went over leveraging ygot to create Go structs. My now in-person friend Danny Wade also made a new post that recapped AutCon. Both are excellent reads and good people; check them out.
Shortly after the event, I wanted to run a simple continuous integration pipeline with Containerlab and some Arista cEOS nodes. Long story short, it worked! However, I had to add a twist to the pipeline by leveraging a GitHub self-hosted runner.
If you’ve read my blogs in the past, you may have run into my six-part blog series on building a CICD pipeline. Think of this post as a modification or add-on to that previous work. I’ll review more tools and provide examples of how they can help you on your network automation journey. I hope you enjoy it.
The why
If you got this far, then I’ve either hooked you with the introduction, or you’re just a fan of my work. Either way, thank you. The main reason for this post is to look at different open-source tools and see how they can be used in our workflows to improve or automate some of the tasks.
One important note! I’ll mention a lot of different tools in this blog, don’t feel like you have to use all of them. Feel free to explore and choose what works for you and your environment.
Requirements
If you want to follow along, you should have a local development machine and a Linux VM or laptop to run the self-hosted runner. In my case, I have it running on a small Linux VM on my Intel NUC (not sponsored). It would be helpful if your development machine has Docker installed, but the Linux VM will need it.
GitHub self-hosted runner
GitHub has robust CI tooling within its platform. We can leverage the tooling to create workflows to automate project tasks. These tasks could be auto-assigning team members to issues, testing code, building artifacts, or validating changes on the network.
These “actions” can run within GitHub’s infrastructure to spin up ephemeral environments. This is fantastic, but it could be better when we need this environment to access our containerized network images. The only vendor I am aware of that allows public pulling of their container image is Nokia with their SRLinux platform.
For my setup, I will be using Arista’s cEOS images. Instead of hosting the image in a public repository (which I don’t think is on the up-and-up), I leveraged the self-hosted runner. Since we manage the self-hosted runner, we can have whatever we want, including container images. More on this in a moment.
GitHub has incredible documentation on installing a self-hosted runner. I won’t duplicate that effort, and I’ll link you to their excellent docs. One important thing to note is that their documentation walks us through installing the application and running it within the terminal. We need it to run in the background as a service. To do this, make sure you follow GitHub’s docs on doing just that. Below is an example output from my VM running the application.
❯ sudo ./svc.sh status

/etc/systemd/system/actions.runner.JulioPDX-ci-avd-clab.dev.service
● actions.runner.JulioPDX-ci-avd-clab.dev.service - GitHub Actions Runner (JulioPDX-ci-avd-clab.dev)
     Loaded: loaded (/etc/systemd/system/actions.runner.JulioPDX-ci-avd-clab.dev.service; enabled; vendor preset: enabled)
     Active: active (running) since Wed 2023-11-22 12:28:11 PST; 3 days ago
   Main PID: 1713 (runsvc.sh)
      Tasks: 23 (limit: 4915)
     Memory: 1.6G
        CPU: 44min 55.008s
     CGroup: /system.slice/actions.runner.JulioPDX-ci-avd-clab.dev.service
             ├─1713 /bin/bash /home/juliopdx/actions-runner/runsvc.sh
             ├─1716 ./externals/node16/bin/node ./bin/RunnerService.js
             └─1724 /home/juliopdx/actions-runner/bin/Runner.Listener run --sta…

Hint: Some lines were ellipsized, use -l to show in full.
Containerlab
Containerlab is my favorite platform for running labs. Whether I’m personally learning, testing, or incorporating it into a blog post like this one, the speed and simplicity Containerlab provides are unmatched. If you are following along, install it with this one-liner.
bash -c "$(curl -sL https://get.containerlab.dev)"
Arista cEOS images
In one of my earlier blog posts, I talked about how to obtain Arista cEOS images. Make a free account on the site, download whatever version you want, and import the image with Docker. Way before I was an Arista employee, I appreciated that the EOS images were free to obtain; more vendors should do this. A new tool is also available called eos-downloader; it is a command line interface to download Arista EOS images. You should check it out.
That is all you need on the Linux VM running the GitHub self-hosted runner application. At the end of this blog, I’ll post a few alternate ways to improve this workflow; feel free to use them as self-learning opportunities.
The basic workflow
In the most high-level view of our build, we have a local development machine where we can make proposed changes to our test network. The changes in “code” are then pushed up to GitHub, where automated workflows will run to lint our code, build the configurations, and test it against a short-lived network.

But it’s so much more
If only the world was that simple. A decent amount of tools are available to make this all happen. Feel free to fork or clone the repository and mess with whatever you want. Below is a view of the folder structure of the repository. Stick with me; I’ll do my best to break down every piece.
git clone https://github.com/JulioPDX/ci-avd-clab.git
> tree -I venv
.
├── ansible.cfg
├── anta
│   ├── anta-inv.yml
│   └── anta-test.yml
├── artifacts
│   ├── config_backup
│   ├── documentation
│   ├── intended
│   │   ├── configs
│   │   ├── structured_configs
│   │   └── test_catalogs
│   └── reports
│       └── anta_reports
├── group_vars
│   ├── all.yml
│   ├── ATD_FABRIC.yml
│   ├── ATD_LAB.yml
│   ├── ATD_SERVERS.yml
│   └── ATD_TENANTS_NETWORKS.yml
├── inventory.yml
├── lab.yml
├── LICENSE
├── playbooks
│   ├── build.yml
│   ├── deploy-net.yml
│   ├── validate-net-anta.yml
│   └── validate-net.yml
├── README.md
├── requirements-dev.txt
├── requirements.txt
├── requirements.yml
└── tasks.py
Preparing the local environment
The repository also includes a .devcontainer file as well. It is handy if you want to develop within a container environment. I’ll walk through setting up a local Python development environment. This assumes you have Python installed. To test more in-depth locally, ensure you have Docker, Containerlab, and a cEOS image available.
cd ci-avd-clab
python3 -m venv venv
source venv/bin/activate
pip install -r requirements-dev.txt
ansible-galaxy collection install -r requirements.yml
GitHub Actions
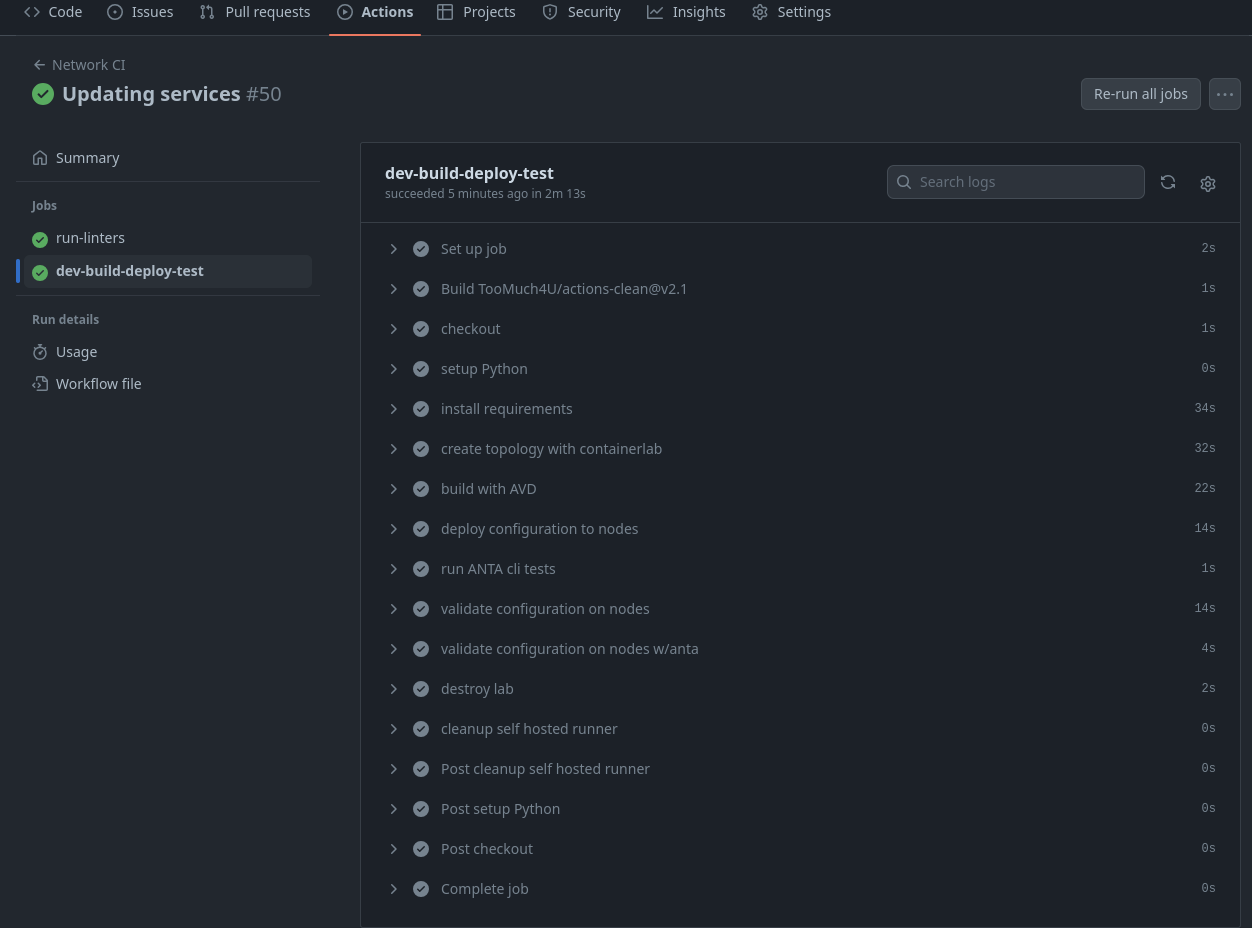
GitHub Actions is the CI/CD platform within GitHub. We can leverage GitHub Actions to create automated workflows within our repository. These workflows can be as simple as linting our codebase for any errors or deploying changes to a test network and notifying us of a pass or fail. Below is the entire look at the GitHub Actions file for this example. The file is located in the .github/workflows folder.
# .github/workflows/dev.yml
---
name: Network CI
on:
pull_request:
branches:
- main
push:
branches:
- main
jobs:
run-linters:
timeout-minutes: 15
runs-on: ubuntu-latest
steps:
- name: checkout
uses: actions/checkout@v4
- name: setup python
uses: actions/setup-python@v4
- name: run pre-commit
uses: pre-commit/action@v3.0.0
dev-build-deploy-test:
needs: run-linters
env:
ANTA_PASSWORD: ${{ secrets.ANTA_PASSWORD }}
SUDO_PASS: ${{ secrets.SUDO_PASS }}
CEOS_VERSION: 4.30.2F
timeout-minutes: 15
runs-on: avd-ci
steps:
- name: checkout
uses: actions/checkout@v4
- name: setup Python
uses: actions/setup-python@v4
with:
python-version: "3.9"
- name: install requirements
run: pip install invoke && invoke setup-base
- name: create topology with containerlab
run: echo $SUDO_PASS | sudo -S containerlab deploy -t lab.yml --reconfigure
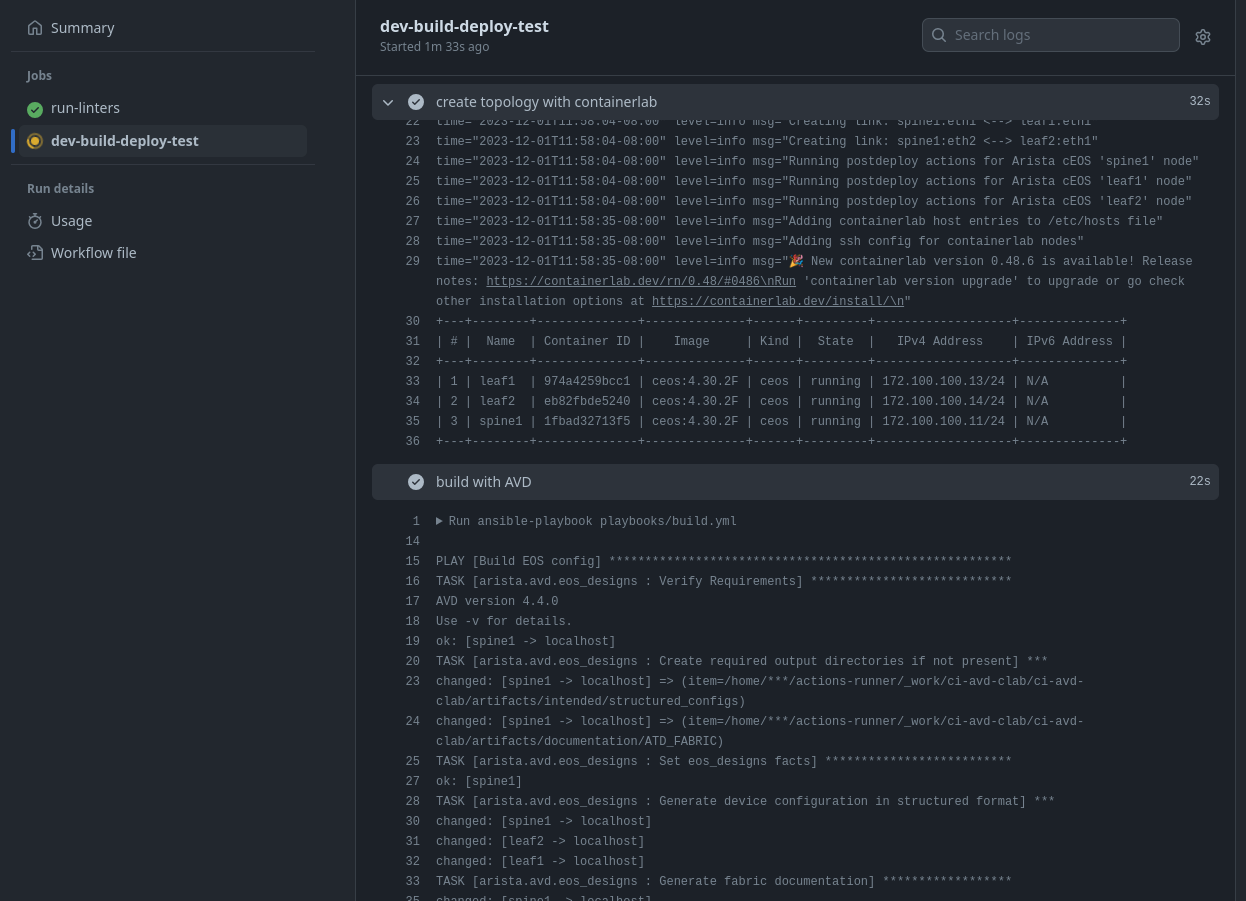
- name: build with AVD
run: ansible-playbook playbooks/build.yml
- name: deploy configuration to nodes
run: |
ansible-playbook playbooks/deploy-net.yml
sleep 10
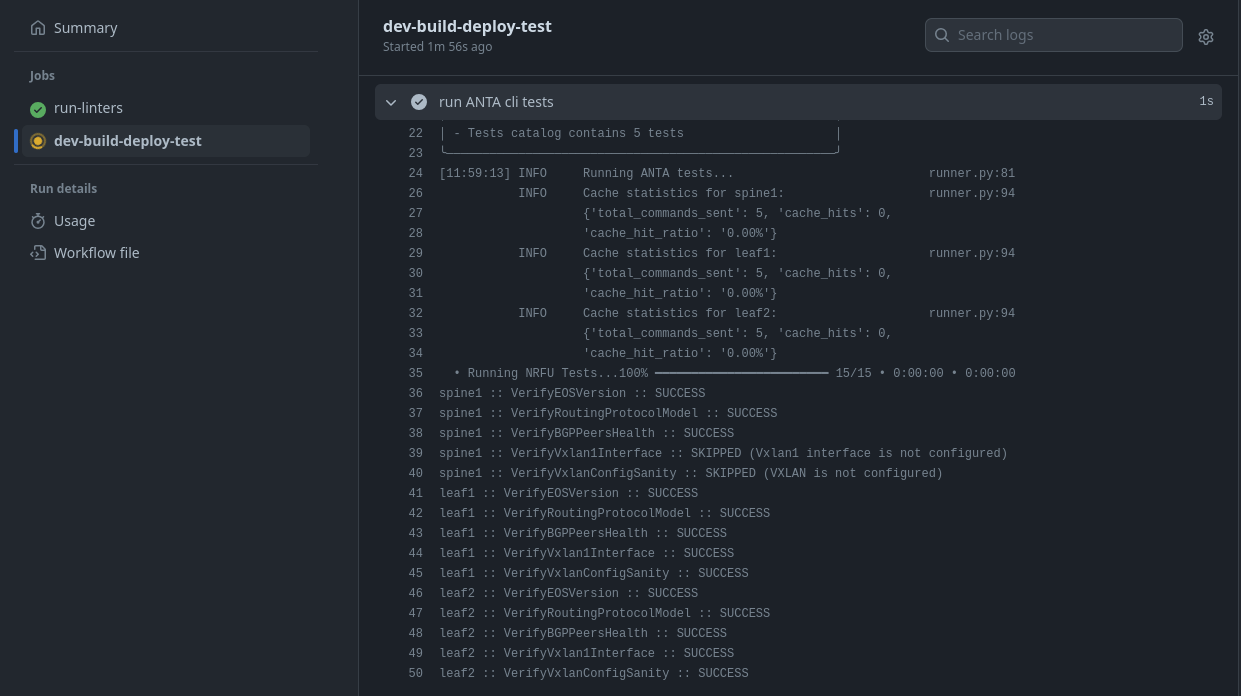
- name: run ANTA cli tests
run: |
anta \
--username admin \
--password $ANTA_PASSWORD \
--inventory anta/anta-inv.yml \
--log-file artifacts/anta.log \
nrfu --catalog anta/anta-test.yml text
- name: validate configuration on nodes
run: ansible-playbook playbooks/validate-net.yml
- name: validate configuration on nodes w/anta
run: ansible-playbook playbooks/validate-net-anta.yml
- name: destroy lab
if: always()
run: echo $SUDO_PASS | sudo -S containerlab destroy -t lab.yml -c
- name: cleanup self hosted runner
if: always()
uses: TooMuch4U/actions-clean@v2.1
I’ll break this down piece by piece and show you most of the tools from my local development machine along the way.
# .github/workflows/dev.yml
---
name: Network CI

on:
  pull_request:
    branches:
      - main
  push:
    branches:
      - main
...
We define a name for the workflow at the root of the GitHub actions file. This doesn’t have any impact on the workflow itself, but it’s always helpful to pick a name with meaning. The on key is where things start to get interesting. Here, we can specify what events and branches we would like this workflow to run on.
Currently, we have it running on a pull request event or a push event, both heading towards the main branch. This definition is not something to use in a production environment. You would likely have a workflow file for your feature/fix branches and another for the main branch (the production network).
Jobs, Linters, and pre-commit
# .github/workflows/dev.yml
...
jobs:
  run-linters:
    timeout-minutes: 15
    runs-on: ubuntu-latest
    steps:
      - name: checkout
        uses: actions/checkout@v4

      - name: setup python
        uses: actions/setup-python@v4

      - name: run pre-commit
        uses: pre-commit/action@v3.0.0
...
jobs in GitHub actions define the individual steps we would like performed for a particular… job. In our example, we have one job that handles the linting of the code base and another that deals with building and testing a virtual network. Right below the job key is the unique name of run-linters, which is user-defined, but again, it should make sense. We then have a runs-on key. The runs-on key defines what platform we would like under the hood for this workflow. You could have a macOS, Windows, or Linux environment. This could also be on the GitHub infrastructure or self-hosted.
The run-linters job doesn’t need access to our self-hosted runner or the container images. It only needs access to the repository. To save on my personal resources, this job uses the ubuntu-latest variant of a GitHub runner (the node performing the steps), which runs on GitHub’s infrastructure. Another thing to note: the timeout-minutes will end the workflow if we exceed that time. This workflow should be far from that, so hitting that limit should signal that we have an issue.
The steps in actions are the units of work we would like performed. We jokingly called them a collection of bash scripts that do a thing. The first two steps are standard in Python projects; we use checkout to make the repository available to the runner and setup-python to ensure Python is in our PATH.
pre-commit
The last step in this job is to run pre-commit. Pre-commit allows us to automate processes before or during the commit process in our development workflow. For example, we could run linters to check for extra new lines in files, lint YAML, or maybe even Python code.
Pre-commit works by defining a .pre-commit.yaml file at the root of our project. Below is a view of the local one from the repository. Automating these processes enables not only yourself but contributors to your project. There is no question on what rules to follow or how Python code should look, “just run pre-commit.”
# .pre-commit-config.yaml
---
repos:
  - repo: https://github.com/pre-commit/pre-commit-hooks
    rev: v4.5.0
    hooks:
      - id: check-yaml
      - id: end-of-file-fixer
      - id: trailing-whitespace
  - repo: https://github.com/ansible/ansible-lint
    rev: v6.22.0
    hooks:
      - id: ansible-lint
  - repo: https://github.com/adrienverge/yamllint.git
    rev: v1.33.0
    hooks:
      - id: yamllint
  - repo: https://github.com/DavidAnson/markdownlint-cli2
    rev: v0.11.0
    hooks:
      - id: markdownlint-cli2
  - repo: https://github.com/astral-sh/ruff-pre-commit
    # Ruff version.
    rev: v0.1.6
    hooks:
      # Run the linter.
      - id: ruff
      # Run the formatter.
      - id: ruff-format
The pre-commit configuration for each tool is mostly the same; some have additional available arguments. In the configuration file, we set the repo location, the rev or version we want, and what hook from the repository. Many hooks can exist in a single repository. For more examples, check out the list of available pre-commit hooks (not all-encompassing).
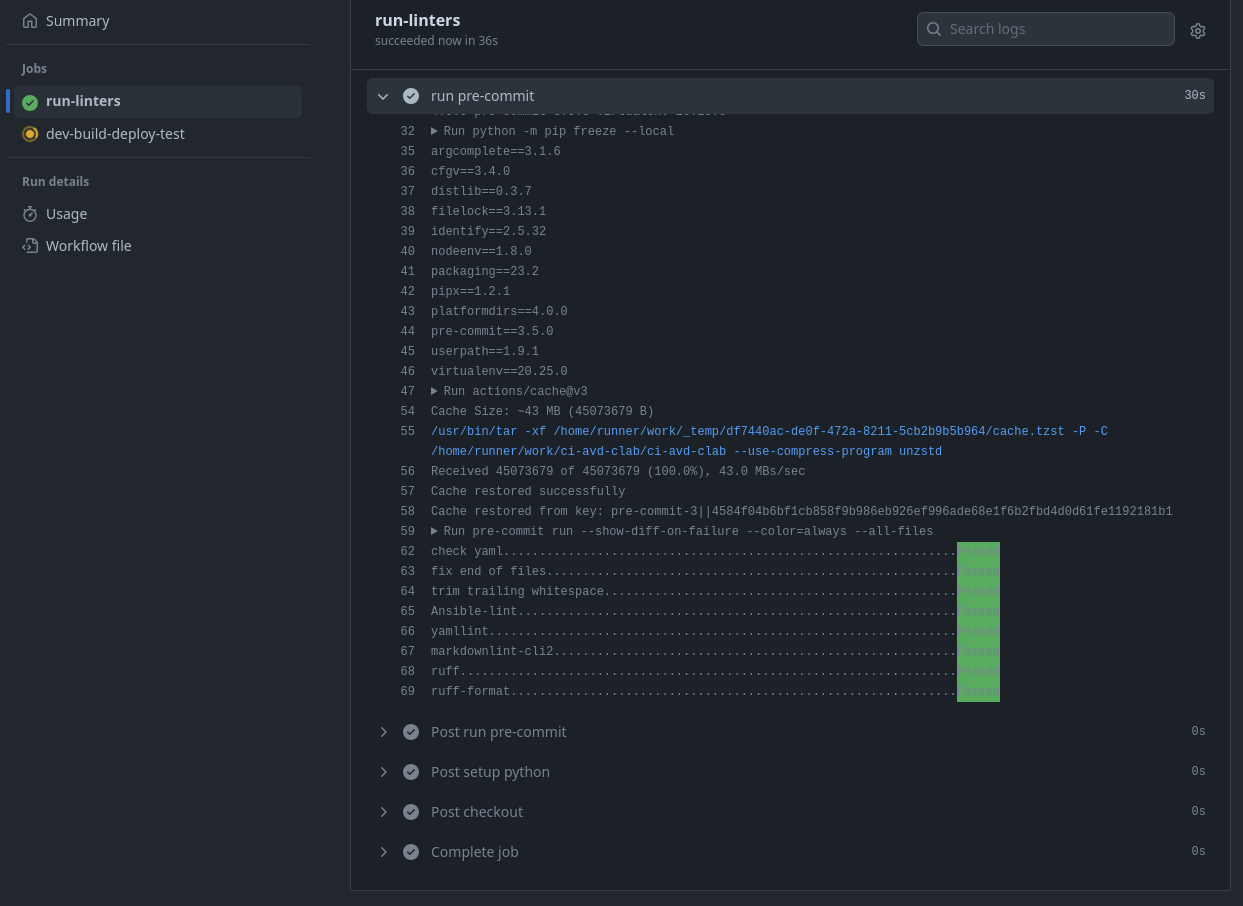
There are two options when running pre-commit. You can add it to your git hooks(pre-commit install), and it will run anytime you try and commit, or you can run it manually (pre-commit run -a). Below is a quick example of pre-commit in action.
The following shows some user errors in files and pre-commit attempts to correct them.
> pre-commit run -a
check yaml...............................................................Passed
fix end of files.........................................................Failed
- hook id: end-of-file-fixer
- exit code: 1
- files were modified by this hook

Fixing lab.yml
Fixing group_vars/ATD_TENANTS_NETWORKS.yml

trim trailing whitespace.................................................Passed
Ansible-lint.............................................................Passed
yamllint.................................................................Passed
markdownlint-cli2........................................................Passed
ruff.....................................................................Passed
ruff-format..............................................................Failed
- hook id: ruff-format
- files were modified by this hook

1 file reformatted
The following is an example of pre-commit passing all checks.
> pre-commit run -a
check yaml...............................................................Passed
fix end of files.........................................................Passed
trim trailing whitespace.................................................Passed
Ansible-lint.............................................................Passed
yamllint.................................................................Passed
markdownlint-cli2........................................................Passed
ruff.....................................................................Passed
ruff-format..............................................................Passed
Feel free to explore the documentation of the various linters used and see if any others will benefit you in your workflows.
The second job
# .github/workflows/dev.yml
...
  dev-build-deploy-test:
    needs: run-linters
    env:
      ANTA_PASSWORD: ${{ secrets.ANTA_PASSWORD }}
      SUDO_PASS: ${{ secrets.SUDO_PASS }}
      CEOS_VERSION: 4.30.2F

    timeout-minutes: 15
    runs-on: avd-ci
...
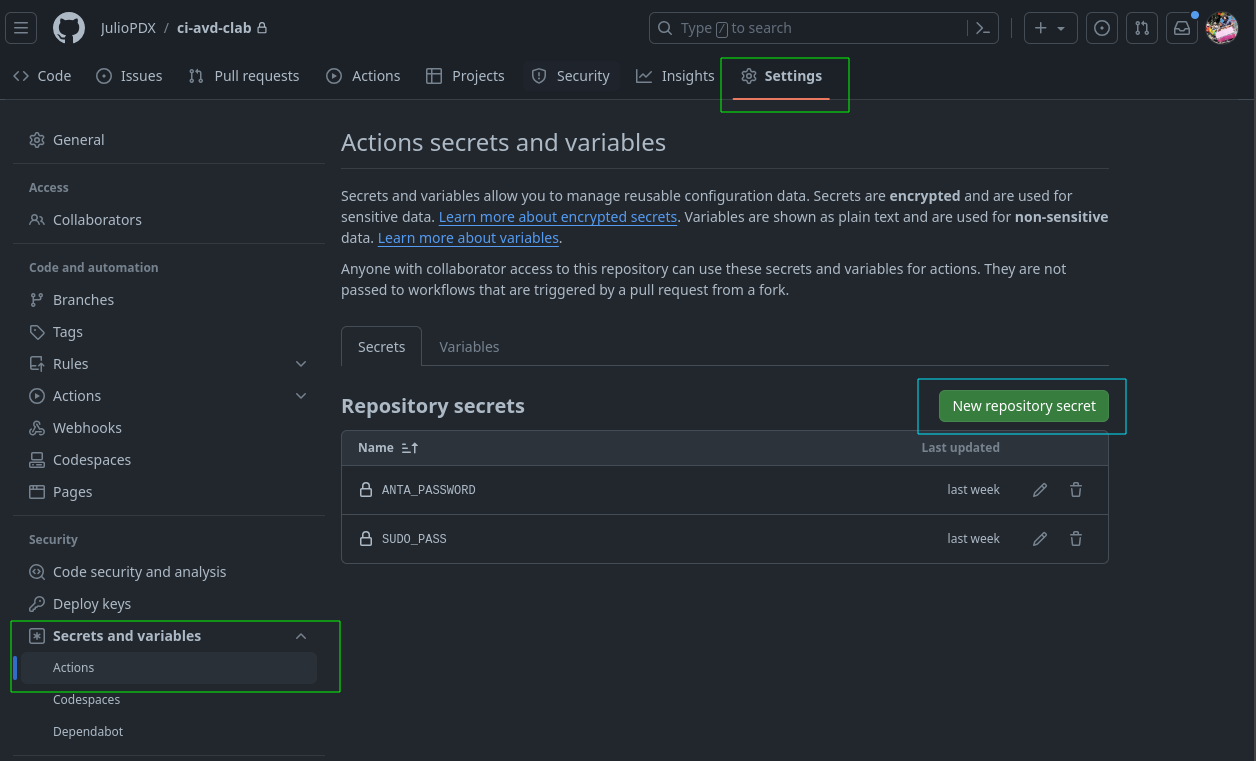
Moving down the actions file, we now have our second job. Again, we have a name, but now you can see a new key called needs. This key tells this job to wait for the run-linters job to complete before it runs. We also specify three environment variables we would like available to the runner. The ANTA_PASSWORD reflects the password used to connect to EOS nodes in future steps. SUDO_PASS is used to pass along the credential when running Containerlab. These are within the GitHub actions' secrets; set them under the secrets view.
The last variable specifies the version of cEOS I’m using, which is then referenced in the Containerlab topology file. A preview of that is below. In my case, the image is tagged as ceos:4.30.2F.
...
topology:
  kinds:
    ceos:
      image: ceos:${CEOS_VERSION:=4.30.2F}
...
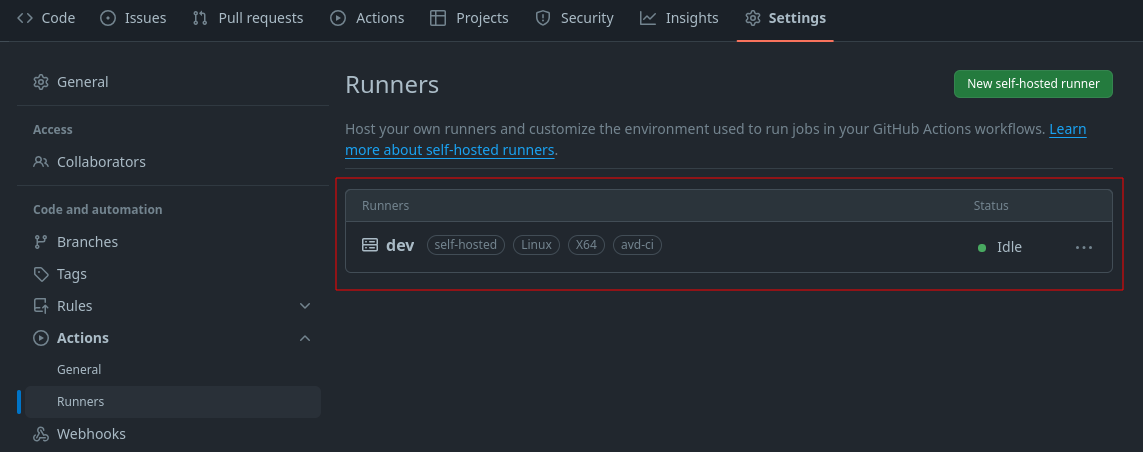
The end of the workflow file above mentions a new runs-on value. Installing the self-hosted application instructs us to set a tag or use the default. Below is a view of my runner with the avd-ci tag available. Your installation will be different.
Invoke and Containerlab
# .github/workflows/dev.yml
...
steps:
- name: checkout
uses: actions/checkout@v4
- name: setup Python
uses: actions/setup-python@v4
with:
python-version: "3.9"
- name: install requirements
run: pip install invoke && invoke setup-base
- name: create topology with containerlab
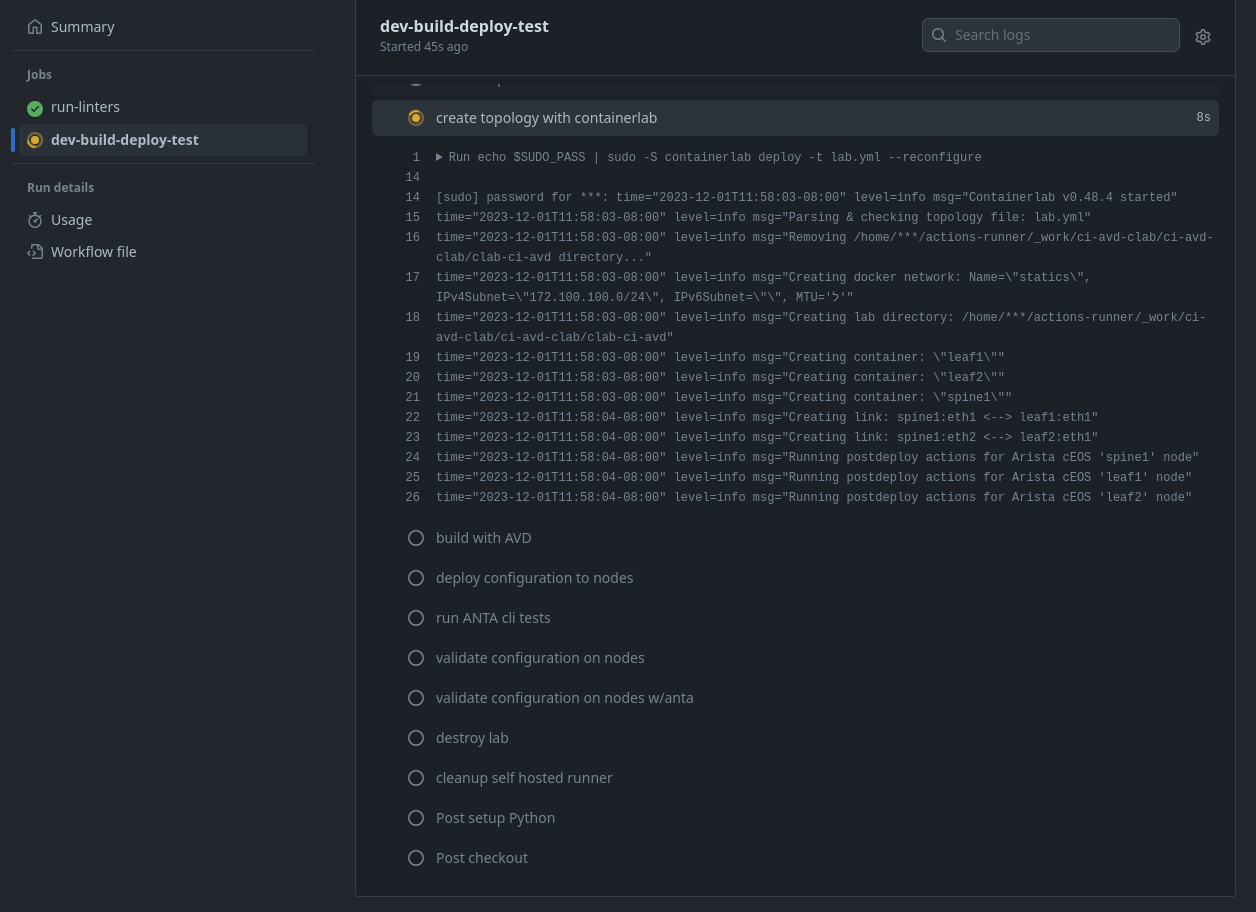
run: echo $SUDO_PASS | sudo -S containerlab deploy -t lab.yml --reconfigure
...
Top-level portions are similar to our first job; the main difference is that we are specifying a specific Python version that should be in our PATH this time. Similar to my earlier comment that pre-commit hooks have additional arguments, action steps also have them.
The last two steps use the run variant. This simply means “run the following commands on the runner.” Invoke was new for me on this journey; I like to think of Invoke as a more Pythonic replacement for Makefiles. Invoke allows us to automate tasks as well by defining them in Python. Below is an example of the setup_base function, which leverages two other functions; install_python_reqs and install_ansible_collections. We can use this to ensure our self-hosted runner has all our requirements installed.
The last step listed shows the use of our SUDO_PASS environment variable; we need the variable to run Containerlab as sudo. Please let me know if you know of a better or easier way to make this work. The Containerlab command always runs with the --reconfigure flag. We basically always want the environment to be a fresh deployment. You could also build this to never shut down the test environment; that would remove the build times in the workflow.
# tasks.py
...
@task()
def setup_base(ctx):
    """
    Set up the development container environment.
    This task runs other tasks to install various requirements.
    """

    # Install Python project and development requirements
    install_python_reqs(ctx)

    # Install Ansible collection requirements
    install_ansible_collections(ctx)


@task()
def install_python_reqs(ctx):
    """
    Install project Python requirements.
    """
    print("Installing Project Python Requirements")
    ctx.run("pip install --upgrade pip")
    ctx.run(f"pip install -r {REQUIREMENTS_FILE_PYTHON_DEV}")


@task()
def install_ansible_collections(ctx):
    """
    Install Ansible collection requirements, including Arista AVD collection.
    """
    print("Installing Project Ansible Collection Requirements")
    ctx.run(
        f"ansible-galaxy collection install -r {REQUIREMENTS_FILE_ANSIBLE} --force-with-deps"
    )
...
A view of our lab file is below. It’s a single spine and two leaf deployment.
# lab.yml
---
name: ci-avd
prefix: ""

mgmt:
  network: statics
  ipv4-subnet: 172.100.100.0/24

topology:
  kinds:
    ceos:
      image: ceos:${CEOS_VERSION:=4.30.2F}
  nodes:
    spine1:
      kind: ceos
      mgmt-ipv4: 172.100.100.11
    leaf1:
      kind: ceos
      mgmt-ipv4: 172.100.100.13
    leaf2:
      kind: ceos
      mgmt-ipv4: 172.100.100.14
  links:
    - endpoints: ["spine1:eth1", "leaf1:eth1"]
    - endpoints: ["spine1:eth2", "leaf2:eth1"]
If you are following along or would like to test locally, feel free to spin up the lab
sudo clab deploy -t lab.yml
Arista Validated Designs
# .github/workflows/dev.yml
...
      - name: build with AVD
        run: ansible-playbook playbooks/build.yml

      - name: deploy configuration to nodes
        run: |
          ansible-playbook playbooks/deploy-net.yml
          sleep 10
...
AVD is an interesting framework. It allows us to define our network using abstracted data models. For example, if I want to add a new VLAN or VRF, I would define that in a common YAML file related to the nodes in my topology. I may want to define common services like NTP, DNS, etc. I would do that from a common or specific (depending on the use case) YAML file. For example, run the following Ansible playbook to see what AVD accomplishes.
ansible-playbook playbooks/build.yml
The definitions for this deployment are defined under the group_vars directory.
# playbooks/build.yml
---
- name: Build EOS config
  hosts: ATD_FABRIC
  connection: local
  gather_facts: false

  tasks:
    - name: Generate intended variables
      ansible.builtin.import_role:
        name: arista.avd.eos_designs

    - name: Generate device intended config and documentation
      ansible.builtin.import_role:
        name: arista.avd.eos_cli_config_gen
Please note every CLI output in this blog is in real-time.

AVD leverages roles within Ansible to abstract away a lot of the complexity. The neat thing is that we have complete running and structured configurations (in YAML) per device and site documentation.
├── artifacts
│   ├── config_backup
│   ├── documentation
│   │   ├── ATD_FABRIC
│   │   │   ├── ATD_FABRIC-documentation.md
│   │   │   ├── ATD_FABRIC-p2p-links.csv
│   │   │   └── ATD_FABRIC-topology.csv
│   │   └── devices
│   │       ├── leaf1.md
│   │       ├── leaf2.md
│   │       └── spine1.md
│   ├── intended
│   │   ├── configs
│   │   │   ├── leaf1.cfg
│   │   │   ├── leaf2.cfg
│   │   │   └── spine1.cfg
│   │   ├── structured_configs
│   │   │   ├── leaf1.yml
│   │   │   ├── leaf2.yml
│   │   │   └── spine1.yml
Feel free to review the generated artifacts or modify the ATD_TENANTS_NETOWRKS.yml file with an additional SVI and rerun the build playbook.
The bonus example
When AVD was first created, it was available as an Ansible collection; now we can leverage the Python implementation of AVD using pyavd. A reasonably rough Python script is in the repository if you want to test it. Please note pyavd is in beta, so your mileage may vary.
You may need to install ansible instead of only installing ansible-core.
pip install ansible rich pyavd
# avd-py.py
import copy
import difflib
import io
import sys
from ansible.inventory.manager import InventoryManager
from ansible.parsing.dataloader import DataLoader
from ansible.vars.manager import VariableManager
from rich.progress import Progress
from pyavd import (
    get_avd_facts,
    get_device_structured_config,
    get_device_config,
    validate_inputs,
)
from rich import print


# Recreating the inventory objects to be like  Ansible
dl = DataLoader()
im = InventoryManager(loader=dl, sources=["inventory.yml"])
vm = VariableManager(loader=dl, inventory=im)

hosts = {}

# grab all the hosts and add the hostname with relevant
# variables to the hosts dictionary
# deep copy required to make sure information is not overwritten
for host in im.get_hosts("all"):
    host_vars = vm.get_vars(host=host)
    hosts[str(host)] = copy.deepcopy(host_vars)

with Progress() as progress:
    # progress bars for pretty output
    total = len(hosts)
    task1 = progress.add_task("[red]facts...", total=1)
    task2 = progress.add_task("[blue]validate inputs...", total=total)
    task3 = progress.add_task("[yellow]structured config...", total=total)
    task4 = progress.add_task("[green]build config...", total=total)

    facts = get_avd_facts(hosts)
    progress.update(task1, advance=1)

    # loop to check the state of validate status and print
    # any errors
    for k, v in hosts.items():
        validate = validate_inputs(v)

        if validate.failed:
            print(f"The following validation errors were seen for {k}")
            for issue in validate.validation_errors:
                print(issue)
            sys.exit(1)
        progress.update(task2, advance=1)

        struct_conf = get_device_structured_config(k, v, facts)
        progress.update(task3, advance=1)

        config = get_device_config(struct_conf)
        buf = io.StringIO(config)
        print(k)
        try:
            with open(f"artifacts/intended/configs/{k}.cfg") as file:
                old = file.readlines()

            for line in difflib.unified_diff(old, buf.readlines(), lineterm=""):
                print(line)

            with open(f"artifacts/intended/configs/{k}.cfg", "w") as f:
                f.writelines(config)

        except FileNotFoundError:
            with open(f"artifacts/intended/configs/{k}.cfg", "w") as f:
                f.writelines(config)

        progress.update(task4, advance=1)

The last step deals with running a configuration replacement on our nodes from the generated configurations.
# playbooks/deploy-net.yml
---
- name: Build EOS config
  hosts: ATD_FABRIC
  connection: local
  gather_facts: false

  tasks:
    - name: Generate intended variables
      ansible.builtin.import_role:
        name: arista.avd.eos_config_deploy_eapi

I don’t have a Python configuration replacement example but feel free to experiment and create one. You could always use something like NAPALM, Netmiko, or Scrapli.
AVD validate state & Arista Network Test Automation (ANTA)
...
      - name: run ANTA cli tests
        run: |
          anta \
              --username admin \
              --password $ANTA_PASSWORD \
              --inventory anta/anta-inv.yml \
              --log-file artifacts/anta.log \
              nrfu --catalog anta/anta-test.yml text

      - name: validate configuration on nodes
        run: ansible-playbook playbooks/validate-net.yml

      - name: validate configuration on nodes w/anta
        run: ansible-playbook playbooks/validate-net-anta.yml
...
AVD has a role to validate the state of our deployed network. Below is an example of the playbook and the output. The validate state role will also produce reports on passing or failing tests.
ansible-playbook playbooks/validate-net.yml

artifacts/reports
├── anta_reports
├── ATD_FABRIC-state.csv
└── ATD_FABRIC-state.md
ANTA is the new kid on the block for network testing. There are a few ways to implement ANTA. We can use it directly in Python, leverage the CLI tool, or in a preview release within AVD Ansible. The ANTA AVD variant makes things fairly automated as far as test definitions. We basically set the use_anta variable to true. Below is the view of the playbook and the output.
---
- name: Validate deployed config
  hosts: ATD_FABRIC
  connection: httpapi
  gather_facts: false

  vars:
    use_anta: true

  tasks:
    - name: Validate EOS state with ANTA
      ansible.builtin.import_role:
        name: arista.avd.eos_validate_state
Below is the output from the ANTA validate playbook.

Below is a quick example of one of the generated artifacts.

ANTA also has a CLI, which requires two main parts: an inventory definition and a test catalog.
Here’s a view of our inventory.
# anta/anta-inv.yml
---
anta_inventory:
  hosts:
    - host: 172.100.100.11
      name: spine1
      tags: ["fabric", "spine"]
    - host: 172.100.100.13
      name: leaf1
      tags: ["fabric", "leaf", "pod1"]
    - host: 172.100.100.14
      name: leaf2
      tags: ["fabric", "leaf", "pod2"]
Here’s a look at the test catalog. These are YAML representations of the Python classes in the code. Head to the documentation to see what’s available. I’ll show an example of a pass and a fail.
---
anta.tests.software:
  # Verifies the device is running one of the allowed EOS version.
  - VerifyEOSVersion:
      # List of allowed EOS versions.
      versions:
        - 4.30.2F-33092737.4302F (engineering build)

anta.tests.routing.generic:
  - VerifyRoutingProtocolModel:
      model: "multi-agent"

anta.tests.routing.bgp:
  - VerifyBGPPeersHealth:
      address_families:
        - afi: ipv4
          safi: unicast

anta.tests.vxlan:
  - VerifyVxlan1Interface:
  - VerifyVxlanConfigSanity:
export ANTA_PASSWORD=somesecretpassword
anta \
--username admin \
--password $ANTA_PASSWORD \
--inventory anta/anta-inv.yml \
--log-file artifacts/anta.log \
nrfu --catalog anta/anta-test.yml table

I’ll slightly edit by modifying the Routing Protocol Model.

Cleaning the self-hosted runner
# .github/workflows/dev.yml
...
      - name: destroy lab
        if: always()
        run: echo $SUDO_PASS | sudo -S containerlab destroy -t lab.yml -c

      - name: cleanup self hosted runner
        if: always()
        uses: TooMuch4U/actions-clean@v2.1
The GitHub runners are usually ephemeral; we don’t have to worry about cleanup. The self-hosted runner is different since the environment can last indefinitely. We use these last steps to clean up files we don’t need and destroy our topology. Please note the new key of if; we want these steps to run no matter what happens in the pipeline run.
Run the Pipeline
Wow, that was a lot of information. Please let me know if you have any questions or feel something needs clarification. I’ll add a new service to the network by editing the group_vars/ATD_TENANTS_NETWORKS.yml file and then pushing it up to the repository, which should kick off a pipeline run.
# ATD_TENANTS_NETWORKS.yml
---
tenants:
  # Tenant A Specific Information - VRFs / VLANs
  - name: Tenant_A
    mac_vrf_vni_base: 10000
    vrfs:
      - name: Tenant_A_OP_Zone
        vrf_vni: 10
        vtep_diagnostic:
          loopback: 100
          loopback_ip_range: 10.255.1.0/24
        svis:
          - id: 110
            name: Tenant_A_OP_Zone_1
            tags: [opzone]
            enabled: true
            ip_address_virtual: 10.1.10.1/24
          - id: 111
            name: Tenant_A_OP_Zone_2
            tags: [opzone]
            enabled: true
            ip_address_virtual: 10.1.11.1/24
    l2vlans:
      - id: 160
        vni_override: 55160
        name: Tenant_A_VMOTION
        tags: [vmotion]
git add .
git commit -m "something"
git push
Outro and links
Thank you all so much for reading this far. I hope something in here is helpful in your automation journey. Please explore and plug tools into different areas to see if you can make it work. Massive shout-out to Ryan Merolle; he deserves much credit for the work on this repository. Thank you so much for contributing.
- Featured Image Atanas Malamov
- Ryan on Twitter/X, give him a follow
- GitHub repository