7 minutes
Automating Multi Vendor Environments With Netmiko
Introduction
Hello again! I was working through Nick Russos’ awesome Automating Networks with Python course on Pluralsight, check it out HERE. In the course, Nick does a great job of breaking down the code and the functionality of each bit. I’m still doing a lot of leaning in Python so please bear with me.
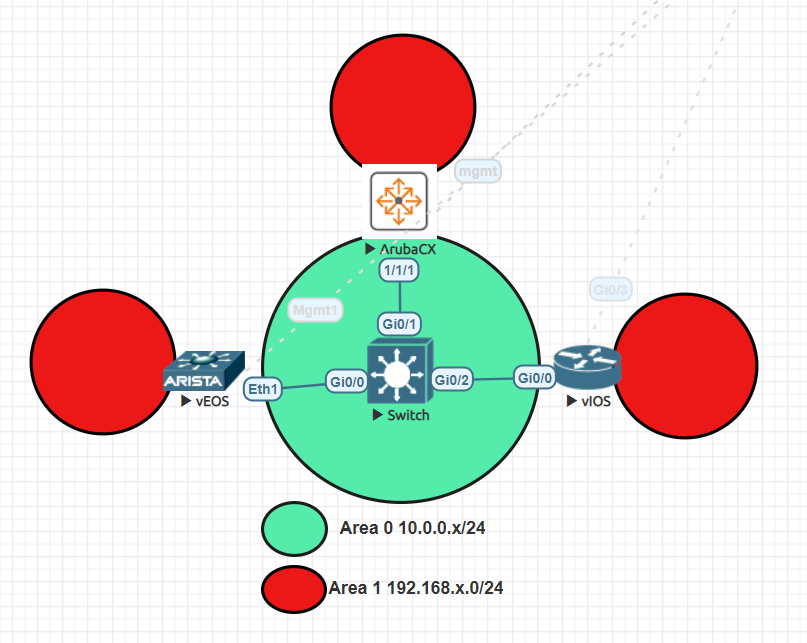
The course uses an MPLS environment as an example of network automation with Python. I decided to use the principles taught in the Netmiko portion of the course to try and automate some OSPF between multiple vendors. As you can see above, we are featuring Arista, Aruba, and Cisco. The topology is nothing crazy. All router facing ports are in area 0 and sharing routes. Every router will have a loopback interface to host a network. The only other caveat is that interfaces are passive by default and we enable each interface separately.
Host Variables
Each host has its own variable file. I tried to use something that made sense to me. There’s probably a better way to organize this file, it works, so I can dig it. Below is a sample of the Arista vEOS node. Each one is essentially the same besides two or three variables.
vEOS.yaml
---
hostname: vEOS
interfaces:
  - name: Ethernet1
    ip: 10.0.0.2/24
    ospf:
      process: 1
      area: 0
      passive: False
  - name: Loopback0
    ip: 192.168.2.1/24
    ospf:
      process: 1
      area: 1
ospf:
  process: 1
  router_id: 2.2.2.2
  area:
    - 0
    - 1
OSPF and Jinja
The jinja file process isn’t too bad. If you know loops, if, and else statements, you’ll be just fine. I’m pretty familiar with Aruba and Cisco but not so much with Arista. Lucky for me Arista is eerily similar to Cisco Syntax. I generally work my way through configuring the devices manually once and then convert the configurations to a template. Below is the Aruba version of the jinja template, each vendor gets its own jinja file.
hp_procurve.j2
{% if data.ospf %}
router ospf {{ data.ospf.process }}
    router-id {{ data.ospf.router_id }}
    passive-interface default
{% for area in data.ospf.areas %}
    area {{ area }}
{% endfor %}
{% for int in data.interfaces %}
{% if int.ospf %}
interface {{ int.name }}
{% if "back" not in int.name %}
    no shutdown
{% endif%}
    ip address {{ int.ip }}
    ip ospf {{ int.ospf.process }} area {{ int.ospf.area }}
{% if int.ospf.passive == False %}
    no ip ospf passive
{% endif %}
{% endif %}
{% endfor %}
{% endif %}
copy running-config startup-config
The Script
I wont go too deep in breaking down the file as I think it would take a while and I would really recommend you check out Nicks’ course I linked above. If I were to break down the script at a high level, below are the steps that are being performed.
- Import the required libraries.
- Define functions for address management (more on this later).
- Define the main function to load in host variables, jinja environment, and loop over each host.
- Bonus, network backup task (why not?).
ospf_netmiko.py
#! /usr/bin/env python

# Import requirements
from yaml import safe_load
from netmiko import Netmiko
from jinja2 import Environment, FileSystemLoader
from netaddr import IPNetwork
from rich import print as pr

# functions to be used in jinja templates for IP management
def address(a):
    a = str(IPNetwork(a).ip)
    return a


def mask(b):
    b = str(IPNetwork(b).netmask)
    return b


def main():

    # Open hosts file as variable for future use
    with open("hosts.yaml", "r") as handle:
        host_root = safe_load(handle)
    pr(host_root)

    # Set platform map to match netmiko
    platform_map = {"ios": "cisco_ios", "arista": "arista_eos", "aruba": "hp_procurve"}

    # Assigning platform variable to each host
    for host in host_root["host_list"]:
        platform = platform_map[host["platform"]]

        # Load in the host specific vars
        with open(f"vars/{host['name']}.yaml", "r") as handle:
            ospf = safe_load(handle)

        # This portion is essentially configuring our jinja environment
        j2_env = Environment(
            loader=FileSystemLoader("."), trim_blocks=True, autoescape=True
        )
        # https://www.kite.com/python/answers/how-to-call-a-function-in-a-jinja2-template-in-python
        j2_env.globals["address"] = address
        j2_env.globals["mask"] = mask

        template = j2_env.get_template(f"templates/netmiko/{platform}.j2")
        new_ospf_config = template.render(data=ospf)
        pr(f"\n{new_ospf_config}")

        conn = Netmiko(
            host=host["mgmt"],
            username=host["username"],
            password=host["password"],
            device_type=platform,
        )

        pr(f"\n#### Logged into {conn.find_prompt()}, woohoo! ####")

        result = conn.send_config_set(new_ospf_config.split("\n"))

        print(result)

        with open(f"backups/{host['name']}.conf", "w") as writer:
            result = conn.send_command("show run")
            writer.writelines(result)

        conn.disconnect()


if __name__ == "__main__":
    main()
Bonus, The Ansibilism
Something you will run into when diving into network automation is address management. Hmm or should I say address format conversion. Some network operating systems accept the format of “192.168.1.1/24” for address assignment and others accept “192.168.1.1 255.255.255.255.0”. My background is more in Ansible and I would usually do something like the following.
address = "192.168.1.1/24"
# Jinja
interface gig0/0
   ip address {{ address | ipaddr('address') }} {{ address | ipaddr('netmask') }}
   no shutdown
I was curious if something similar was available when using Jinja in Python. Honestly, I’m not sure and I bet there’s an easier way. If there is please let me know, and tell me “this is the way”. Long story short, this led me to the link included in the script and a bit of time on the python interpreter for testing. My testing went something like the following.
testing
In [1]: from netaddr import *
In [2]: a = "192.168.1.1/24"
In [3]: str(IPNetwork(a).ip)
Out[3]: '192.168.1.1'
In [4]: str(IPNetwork(a).netmask)
Out[4]: '255.255.255.0'
In [5]:
Now that I had the format, I created two functions, one for the address portion and one for the netmask. Ill show the relevant snippets from all the pieces involved below!
Odds and Ends
from netaddr import IPNetwork

def address(a):
    a = str(IPNetwork(a).ip)
    return a


def mask(b):
    b = str(IPNetwork(b).netmask)
    return b

# https://www.kite.com/python/answers/how-to-call-a-function-in-a-jinja2-template-in-python
        j2_env.globals["address"] = address
        j2_env.globals["mask"] = mask

# From Template
ip address {{ address(int.ip) }} {{ mask(int.ip) }}
Script Output
{
     'host_list': [
         {
             'name': 'vIOS',
             'platform': 'ios',
             'mgmt': '192.168.10.122',
             'username': 'cisco',
             'password': 'cisco'
         },
         {
             'name': 'ArubaCX',
             'platform': 'aoscx',
             'mgmt': '192.168.10.142',
             'username': 'admin',
             'password': 'aruba'
         },
         {
             'name': 'vEOS',
             'platform': 'eos',
             'mgmt': '192.168.10.151',
             'username': 'admin',
             'password': 'arista'
         }
     ]
 }
 Configuration to be loaded on vIOS:
 router ospf 1
     router-id 3.3.3.3
     passive-interface default
     no passive-interface GigabitEthernet0/0
 interface GigabitEthernet0/0
     no shutdown
     ip address 10.0.0.3 255.255.255.0
     ip ospf 1 area 0
 interface Loopback0
     ip address 192.168.3.1 255.255.255.0
     ip ospf 1 area 1
 do wr
 Logged into vIOS#, woohoo!
 configure terminal
 Enter configuration commands, one per line.  End with CNTL/Z.
 vIOS(config)#router ospf 1
 vIOS(config-router)#    router-id 3.3.3.3
 vIOS(config-router)#    passive-interface default
 vIOS(config-router)#    no passive-interface GigabitEthernet0/0
 vIOS(config-router)#interface GigabitEthernet0/0
 vIOS(config-if)#    no shutdown
 vIOS(config-if)#    ip address 10.0.0.3 255.255.255.0
 vIOS(config-if)#    ip ospf 1 area 0
 vIOS(config-if)#interface Loopback0
 vIOS(config-if)#    ip address 192.168.3.1 255.255.255.0
 vIOS(config-if)#    ip ospf 1 area 1
 vIOS(config-if)#do wr
 Building configuration…
 [OK]
 vIOS(config-if)#end
 vIOS#
 Configuration to be loaded on ArubaCX:
 router ospf 1
     router-id 1.1.1.1
     passive-interface default
     area 0.0.0.0
     area 0.0.0.1
 interface 1/1/1
     no shutdown
     ip address 10.0.0.1/24
     ip ospf 1 area 0.0.0.0
     no ip ospf passive
 interface loopback 0
     ip address 192.168.1.1/24
     ip ospf 1 area 0.0.0.1
 copy running-config startup-config
 Logged into ArubaCX#, woohoo!
 configure terminal
 ArubaCX(config)# router ospf 1
 ArubaCX(config-ospf-1)#     router-id 1.1.1.1
 ArubaCX(config-ospf-1)#     passive-interface default
 ArubaCX(config-ospf-1)#     area 0.0.0.0
 ArubaCX(config-ospf-1)#     area 0.0.0.1
 ArubaCX(config-ospf-1)# interface 1/1/1
 ArubaCX(config-if)#     no shutdown
 ArubaCX(config-if)#     ip address 10.0.0.1/24
 ArubaCX(config-if)#     ip ospf 1 area 0.0.0.0
 ArubaCX(config-if)#     no ip ospf passive
 ArubaCX(config-if)# interface loopback 0
 ArubaCX(config-loopback-if)#     ip address 192.168.1.1/24
 ArubaCX(config-loopback-if)#     ip ospf 1 area 0.0.0.1
 ArubaCX(config-loopback-if)# copy running-config startup-config
 Copying configuration: []
 Copying configuration: [|]
 Copying configuration: [/]
 Copying configuration: [-]
 Copying configuration: []
 Copying configuration: [|]
 Copying configuration: [/]
 Copying configuration: [-]
 Copying configuration: [Success]
 ArubaCX(config-loopback-if)# end
 ArubaCX#
 Configuration to be loaded on vEOS:
 ip routing
 router ospf 1
     router-id 2.2.2.2
     passive-interface default
     no passive-interface Ethernet1
 interface Ethernet1
     no switchport
     no shutdown
     ip address 10.0.0.2/24
     ip ospf area 0.0.0.0
 interface Loopback0
     ip address 192.168.2.1/24
     ip ospf area 0.0.0.1
 do wr
 Logged into vEOS#, woohoo!
 configure terminal
 vEOS(config)#ip routing
 vEOS(config)#router ospf 1
 vEOS(config-router-ospf)#    router-id 2.2.2.2
 vEOS(config-router-ospf)#    passive-interface default
 vEOS(config-router-ospf)#    no passive-interface Ethernet1
 vEOS(config-router-ospf)#interface Ethernet1
 vEOS(config-if-Et1)#    no switchport
 vEOS(config-if-Et1)#    no shutdown
 vEOS(config-if-Et1)#    ip address 10.0.0.2/24
 vEOS(config-if-Et1)#    ip ospf area 0.0.0.0
 vEOS(config-if-Et1)#interface Loopback0
 vEOS(config-if-Lo0)#    ip address 192.168.2.1/24
 vEOS(config-if-Lo0)#    ip ospf area 0.0.0.1
 vEOS(config-if-Lo0)#do wr
 Copy completed successfully.
 vEOS(config-if-Lo0)#end
 vEOS#
Outro and Links
Thank you for reading this far. I really do appreciate it. Stay safe and cheers!