4 minutes
Simple Radius Server in EVE-NG
Introduction
I was recently going through an advanced routing course on Pluralsight by Nick Russo, great course by the way. Check it out HERE. During the course we inevitably get to the services portion. The portion most of us dread as network engineers. This is all the extra stuff. Where the routing and switching might be the sexy topic, services is arguably not that exciting… but very much necessary.
If we are in the process of testing AAA, we will need some form of TACACS or RADIUS server. Deploying a full on RADIUS VM can definitely eat up a lot of resources. GNS3, for example, has an appliance that can be added to provide this functionality. To my knowledge, EVE-NG does not. We will be leveraging FreeRADIUS on a lightweight Ubuntu VM. If you want to learn more about FreeRADIUS, check out the link mentioned below.
I hope to keep this as simple as possible to help the next engineer that has to stand up a simple RADIUS server in their topologies. I will have a few assumptions in this writing. For example, I assume you have some knowledge of using EVE-NG, adding Linux nodes, and most importantly AAA. I will include configurations of the Cisco nodes and useful links at the end of the post!
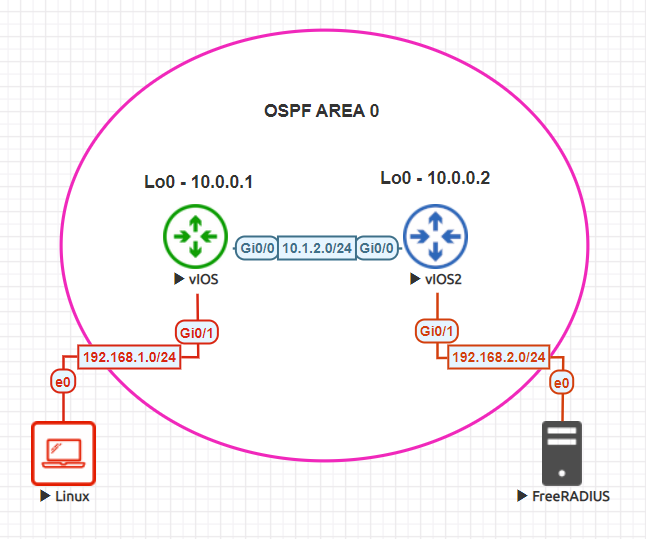
Topology
The topology you see above is pretty bare bones. Two nodes running OSPF and all the networks in area 0. One Linux machine will be used for SSH testing and the other is the FreeRADIUS server (Ubuntu 18.04). I linked the image used above but you can use any standard Ubuntu 18.04 image to run FreeRADIUS.
FreeRADIUS
If your topology already has internet access, you may be able to skip a few of these steps. In my case, this topology is isolated. Start by adding a network connection, this will connect the server to my internal network and give the server access to the internet.
Within the VM console session, run the following commands:
FreeRADIUS Install
sudo apt-get update
sudo apt-get install freeradius -y
Static IP for Ubuntu Server
At this point, the server has FreeRADIUS installed. Now we connect the server as shown in the topology image above and assign a static IP address. In Ubuntu 18.04 this can be done by editing the /etc/netplan/01-netcfg.yaml file. You can edit this file using vi, vim, or nano. Doesn’t really matter. I believe vi and nano come pre installed on this image. Edit that file and save. Example below.
/etc/netplan/01-netcfg.yaml
network:
   version: 2
   renderer: networkd
   ethernets:
     ens3:
       dhcp4: no
       addresses:
         - 192.168.2.2/24
       gateway4: 192.168.2.1
Once that file is saved, run the command below to apply the configuration.
sudo netplan apply
Add Clients and Users
The next step isn’t too bad. You essentially have to modify two files. One for user logins and the other for clients (network devices). The files have a lot of examples and working options. Most all of it is commented out. I’ll include just the portions that are active. Again, feel free to modify this with whatever editor you are comfortable with.
/etc/freeradius/3.0/clients.conf
client vIOS1 {
    ipaddr = 10.0.0.1
    secret = freeradius
}
client vIOS2 {
    ipaddr = 10.0.0.2
    secret = freeradius
}
/etc/freeradius/3.0/mods-config/files/authorize
Julio    Cleartext-Password := "PDX"
         Reply-Message = "Welcome to the world of tomorrow",
         cisco-avpair := "shell:priv-lvl=15"
Once that is completed, run the following commands to activate FreeRADIUS:
sudo service freeradius stop
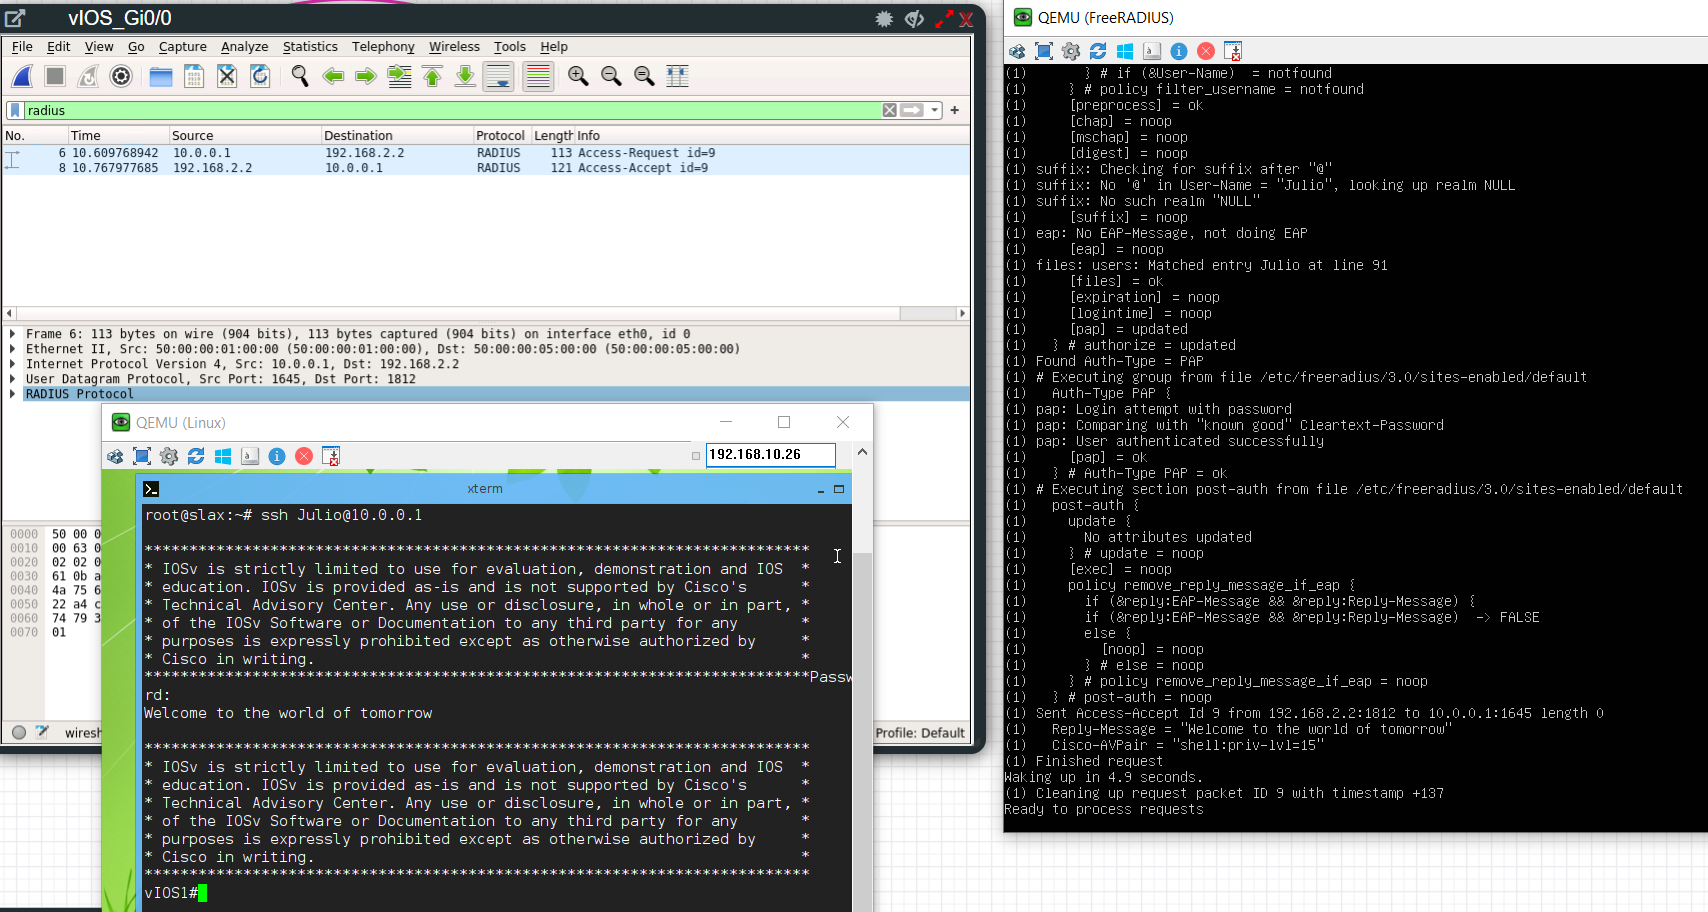
sudo freeradius -X
SSH Validation
Outro and Links
Overall I don’t think it was too much work to get this going. If you build in some automation on the radius server, you could populate all the client entries with Ansible or Python. I think someone with a bit more brain power could probably create a pre built image that has FreeRADIUS pre packaged as an EVE-NG appliance. Thank you for reading this far and I hope this helps you down the road. Best of luck!