6 minutes
Building a Network CI/CD Pipeline Part 3
Introduction
Thank you for checking out part three in this series, it really means a lot! So far we have installed Docker on an Ubuntu host machine and the Drone server/runners. In this post we will go over the .drone.yml file and why I decided to create my first Docker container image. Stick around after the break…. who am I kidding there is no break, what is this an infomercial?
.drone.yml or .drone.yaml or .. something?
Pretty much all CI systems use some kind of configuration file, essentially the steps you want performed on your pipeline run. They all have their own flavor, but essentially walk the same line. My only previous experience was with Azure Devops pipelines. The .drone.yml file should be placed at the root of your directory structure of the project. Below is one of the first versions of the configuration file in my repository.
Initial .drone.yml file
kind: pipeline
type: docker
name: Testing Python CI/CD


steps:
- name: Install and deploy
  image: python
  environment:
    MY_PASS:
      from_secret: MY_PASS
  commands:
  - pip3 install -r requirements.txt
  - python3 bat.py

trigger:
  branch:
    exclude:
    - main
    - master
Lines 1-3 go over the highest level settings of the pipeline. We are using a docker type, since we installed the docker runners. If you are using something like exec, you would have to place that there and install exec runners as well. Lines 6-14 describe the step or steps performed. My simple example is running one step and executing two commands. The image being used is a python Docker image from Docker hub. Once that is pulled down, the commands will execute on the container. The first will install some requirements from my code base and the second will execute the script bat.py. The script itself is just performing a simple connection to devices in my lab. We are utilizing the secret we set earlier in the repository settings here in the script.
The Problem With Requirements
If your environment has very little or no external dependencies, you may not run into this problem. As I got the pipeline working and starting adding more to the code base, this also added more requirements that needed to be installed during the pipeline run. The server created that is hosting these docker containers is not very powerful. That could be the cause of some of these delays. Check out a pipeline run below(a bit exaggerated but you get the point).
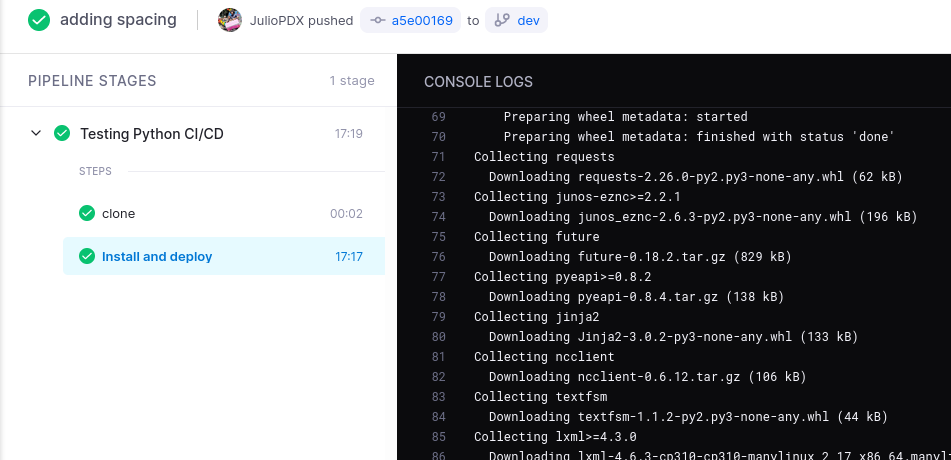
17 minutes!!! Yikes! I think software development has a concept of feedback loops. Where we would like to know if something passed or failed relatively quickly. Over time this would be crazy, imagine waiting that long to find out you had a small code syntax error, I guess it would make for a good time to get a coffee. This then led me down the path of creating a Docker container image.
Creating a Docker Container Image (Optional)
So whats the big deal with this container image? For one, I’ve never even come close to thinking of making one. I’m trying to show you, the reader ,that if there is some technology you don’t know or aren’t comfortable with, with a little time and persistence you can make really cool things happen. I wanted to see if there was some way to make a lightweight python container and then just add on my requirements. I did what any sane person would do… I hit up my friend Google.
Google then led me to this incredible write up by Samuel James, check it out here. We already had Docker installed on our Ubuntu server so that wasn’t required. I did have to create a Docker Hub account and run “docker login”. Once logged in I proceeded with creating the Dockerfile.
Dockerfile
The Dockerfile essentially describes how you want to build your image. Check out my example below.
FROM python:3.9.7-slim

# Install dependencies:
COPY requirements.txt .
RUN pip install -r requirements.txt
That’s about it… no, I’m kidding. The FROM statement is telling docker if we want to base our image from any other image. For this example we are using the python 3.9.7-slim variant. After that I have a requirements.txt file locally that will be copied to the container. Then RUN will execute that command on the container, which will install our dependencies.
requirements.txt
netmiko
rich
black
pybatfish
napalm
pytest
nornir
nornir-utils
nornir-napalm
Build Container and Publish
docker build -t juliopdx/netauto .
docker push juliopdx/netauto:latest
Now that we have a new container image we can use this in our .drone.yml file. If you are really curious check out the docker hub page here. Isn’t it pretty? Check out the updated configuration file below.
.drone.yml
kind: pipeline
type: docker
name: Testing Python CI/CD


steps:
- name: Black Code Format Check
  image: juliopdx/netauto
  commands:
  - black . --check

- name: Precheck OSPF and BGP
  image: juliopdx/netauto
  commands:
  - pytest test.py --disable-pytest-warnings -s

- name: Deploy Configurations
  image: juliopdx/netauto
  environment:
    MY_PASS:
      from_secret: MY_PASS
  commands:
  - python build.py
  when:
    branch:
    - master
    - main

trigger:
  event:
    exclude:
    - pull_request
Lines 1-3 are essentially the same. I updated the steps as well. The first step just makes sure we are adhering to black formatting standards. If there is a file to change the pipeline will fail. The second step runs a few Batfish checks on OSPF and BGP, more on that in a later post. The last step will actually deploy configurations to our test network, but only if it is a main or master branch. The trigger at the bottom is just used to exclude pull requests. Every step pulls down the exact same image (I believe only pulling it down once), to my knowledge each step is actually executed individually. So requirements installed in one step would not exist in another. Okay okay, but what about the pipeline deployment time? Please see below.

Outro and Links
Isn’t that the most beautiful thing ever? A whole 19 seconds <3. Seriously thank you all for reading this far. Next up I think we will go over adding Batfish to the equation. Stayed tuned for the next episode…
- .drone.yml Configuration Options
- Docker Build: A Beginner’s Guide to Building Docker Images by Samuel James
- Featured image by Ian Taylor
- Building a Network CI/CD Pipeline Part 1
- Building a Network CI/CD Pipeline Part 2
- Building a Network Ci/CD Pipeline Part 4
- Building a Network CI/CD Pipeline Part 5
- Building a Network CI/CD Pipeline Part 6