8 minutes
Building a Network CI/CD Pipeline Part 5

Introduction
Hello all, thank you for reading the previous posts in this series. It has been fun interacting with all of you and see a few folks taking the challenge of standing this up on their own. In this post we will go over the framework that is performing our configuration deployments, Nornir and NAPALM. I will also provide an example worklflow on how this is all tied together and executed from a network engineers perspective. Please note, the steps that are performed by Nornir can also be performed by something like Ansible.
Nornir
My previous automation experience revolved heavily around Ansible for interacting with APIs or network nodes. I really like both tools and I feel each has their space in the network automation world. Where Ansible uses yaml for writing playbooks or steps to be executed on nodes, interacting with Nornir stays within the python ecosystem. This lends itself well to using an IDE like Visual Studio Code and all the other tools available within python (linting, debugging, tab completion).
Init Nornir
Lets get started with initializing Nornir and setting some of the configuration. A link to all the code used in this post will be at the end. Below we are importing the “InitNornir” function as well as a local function that is used to handle device credentials.
from nornir import InitNornir
from tools import nornir_set_creds
Below is the main function that is used to initialize Nornir and kick off any tasks that are defined within our deployment script.
def main():
    """Used to run all the things"""
    norn = InitNornir(config_file="configs/config.yaml", core={"raise_on_error": True})
    nornir_set_creds(norn)
    result = norn.run(task=deploy_network)
    print_result(result)


if __name__ == "__main__":
    main()
At this point we are initializing Nornir with a file located at “configs/config.yaml”, lets take a look at that directory.
(venv) juliopdx@juliopdx-pop:~/git/ci_cd_dev$ tree configs/
configs/
├── config.yaml
├── groups.yaml
└── hosts.yaml
This makes me chuckle a bit, I just mentioned that Nornir is pretty much all python and Ansible uses yaml for developing playbooks. Yet here we are making yaml files. Jokes aside, yaml is really good at being human readable and building configuration files. Lets take a look at the “config.yaml” file.
---
inventory:
  plugin: SimpleInventory
  options:
    host_file: "./configs/hosts.yaml"
    group_file: "./configs/groups.yaml"
runner:
  plugin: threaded
  options:
    num_workers: 10
This file can be used to set all kinds of settings. I’ve tried to keep it fairly simple, we are using the “SimpleInventory” plugin. This can read in our hosts and groups file that I will go over in a bit. Other inventroy plugins (Ansible, Netbox, table_inventory) can also be used, check more out here. The second half of the file is utilizing the built-in threaded runner. Nornir will spin up threads to allow task executions to multiple devices vs executed one by one. Next up lets check out the “groups.yaml” file.
---
eos:
  platform: eos
As you can see I have barely used this file. If we were running multiple vendors or maybe devices located at different sites, they could be assigned different configuration options that would be added within this groups file. Below is an example of that concept in case my explanation is a bit terrible.
---
eos:
  platform: eos
cisco_ios:
  platform: ios
branch:
  dns:
  - 8.8.8.8
  - 1.1.1.1
dc:
  dns:
  - 10.0.0.125
  - 10.0.0.126
Last but not least the “hosts.yaml” file. For small deployments I can see how maintaining this file wouldn’t be the worst thing in the world. For scale, I would use something like Netbox to build your inventory file. All nodes in this case are assigned to the “eos” group and will inherit “eos” as the platform.
---
pdx-rtr-eos-01:
  hostname: 192.168.10.121
  groups:
    - eos

pdx-rtr-eos-02:
  hostname: 192.168.10.122
  groups:
    - eos

pdx-rtr-eos-03:
  hostname: 192.168.10.123
  groups:
    - eos

pdx-rtr-eos-04:
  hostname: 192.168.10.124
  groups:
    - eos
Deploy Configurations
Earlier I showed you the main function which is calling on a certain task to be executed. Below is the main function again.
def main():
    """Used to run all the things"""
    norn = InitNornir(config_file="configs/config.yaml", core={"raise_on_error": True})
    nornir_set_creds(norn)
    result = norn.run(task=deploy_network)
    print_result(result)
The main function will call the “deploy_network” function, which will be executed against our network devices in the inventory. Below is the “deploy_network” function.
from nornir_napalm.plugins.tasks import napalm_configure

def deploy_network(task):
    """Configures network with NAPALM"""
    task1_result = task.run(
        name=f"Configuring {task.host.name}!",
        task=napalm_configure,
        filename=f"./snapshots/configs/{task.host.name}.txt",
        dry_run=args.dry,
        replace=True,
    )
We are adding one more import to our script. The “napalm_configure” function is part of the nornir_napalm library. Under the hood it will use NAPALM to connect and configure network devices. The plugin options are pretty extensive depending on what your use case is (deploying entire config or just a subset). This function will look at the file name that matches our device hostname. It will then attempt to push the entire configuration to the device.
Side Note on Infrastructure as Code
For this example we have the device configurations located under the snapshots directory. The entire configuration can be viewed and modified. For a IaC approach, you might develop some yaml or json data that can then be passed into a jinja template to define a configuration file. This file can then be used to configure your entire device. The data files could contain interface settings, routing information, services, pretty much anything that is part of the configuration. Check out this great blog series by NWMichl on Network Infrastructure as Code.
Workflow
Lets take a look at our reference architecture below to get an idea of the workflow we will run through to make a change to our network.
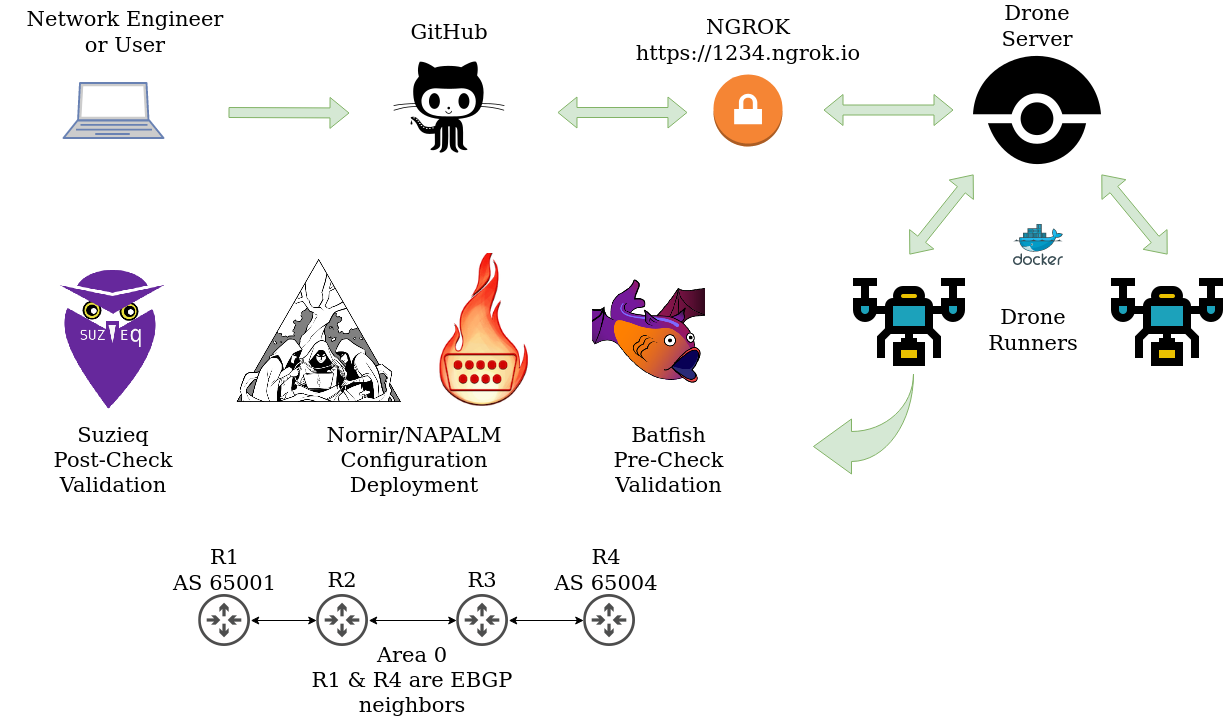
At the bottom of our diagram we have a simple OSPF and BGP network with four Arista devices. We have a task for our junior network engineer to add interface descriptions to all interfaces connected to networking nodes. Since this is a really safe change with no impact to the network, besides maybe confusing some operators if they are incorrect. This seems like a great learning opportunity for the junior engineer.
The engineer starts by cloning the teams repository from GitHub.
git clone https://github.com/JulioPDX/ci_cd_dev.git
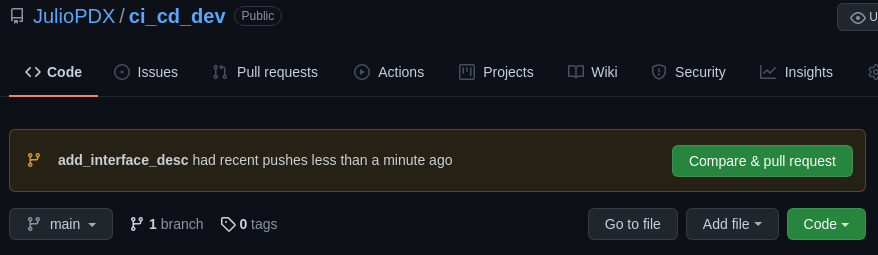
Great, now the repository is local to our development environment. We would most likely have some standards to not allow direct commits to the main branch. All changes must be made to a separate branch and then merged by pull request to main. Main in this case will signal our production configuration state. Next up the junior engineer will create a dev branch named “add_interface_desc”.
(venv) juliopdx@juliopdx-pop:~/git/ci_cd_dev$ git checkout -b add_interface_desc
Switched to a new branch 'add_interface_desc'
(venv) juliopdx@juliopdx-pop:~/git/ci_cd_dev$ git status
On branch add_interface_desc
nothing to commit, working tree clean
Now the engineer is on the new branch and can modify the configuration files in the snapshots directory. Lets look at what files have been modified.
(venv) juliopdx@juliopdx-pop:~/git/ci_cd_dev$ git status
On branch add_interface_desc
Changes not staged for commit:
  (use "git add <file>..." to update what will be committed)
  (use "git restore <file>..." to discard changes in working directory)
        modified:   snapshots/configs/pdx-rtr-eos-01.txt
        modified:   snapshots/configs/pdx-rtr-eos-02.txt
        modified:   snapshots/configs/pdx-rtr-eos-03.txt
        modified:   snapshots/configs/pdx-rtr-eos-04.txt

no changes added to commit (use "git add" and/or "git commit -a")
Great, now lets push those changes up to the remote repository.
(venv) juliopdx@juliopdx-pop:~/git/ci_cd_dev$ git add .
(venv) juliopdx@juliopdx-pop:~/git/ci_cd_dev$ git commit -m "Adding interface descriptions"
[add_interface_desc 9b8d899] Adding interface descriptions
 4 files changed, 6 insertions(+)
(venv) juliopdx@juliopdx-pop:~/git/ci_cd_dev$ git push -u origin add_interface_desc
Enumerating objects: 15, done.
Counting objects: 100% (15/15), done.
Delta compression using up to 8 threads
Compressing objects: 100% (7/7), done.
Writing objects: 100% (8/8), 781 bytes | 390.00 KiB/s, done.
Total 8 (delta 5), reused 0 (delta 0), pack-reused 0
remote: Resolving deltas: 100% (5/5), completed with 5 local objects.
remote:
remote: Create a pull request for 'add_interface_desc' on GitHub by visiting:
remote:      https://github.com/JulioPDX/ci_cd_dev/pull/new/add_interface_desc
remote:
To https://github.com/JulioPDX/ci_cd_dev.git
 * [new branch]      add_interface_desc -> add_interface_desc
Branch 'add_interface_desc' set up to track remote branch 'add_interface_desc' from 'origin'.
(venv) juliopdx@juliopdx-pop:~/git/ci_cd_dev$
From our previous work this should have kicked off a pipeline run without making any actual changes to the nodes.
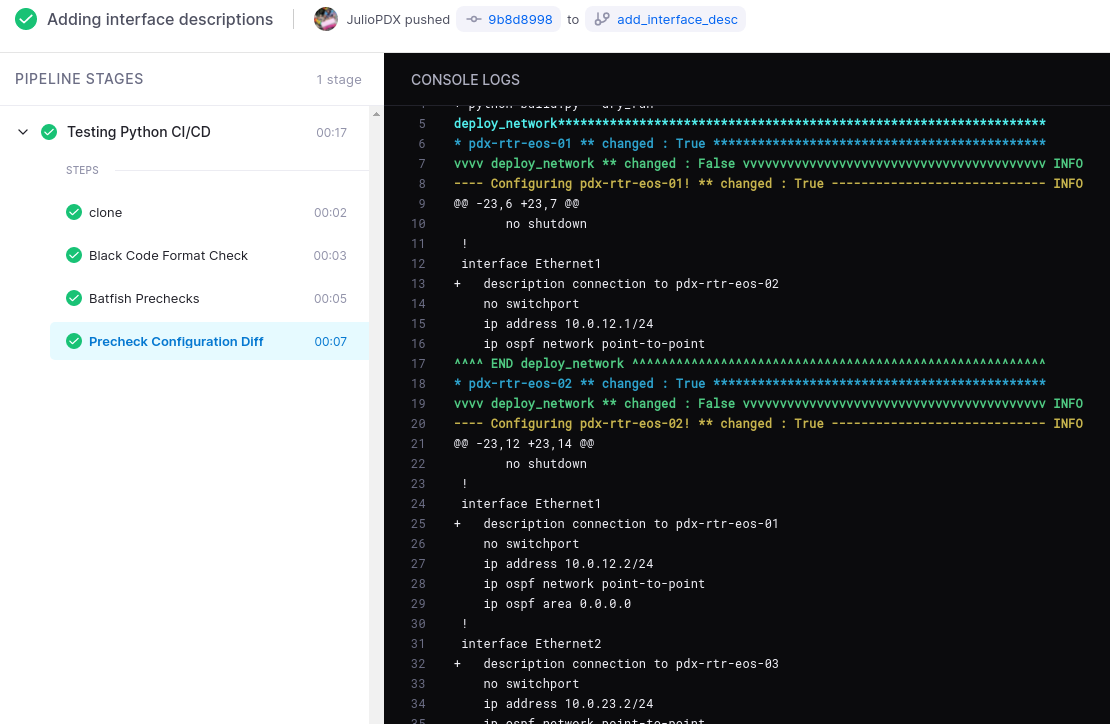
At this point every precheck stage has passed in the pipeline and we can see what the changes would be. We can now create a pull request and merge these changes into our main branch.
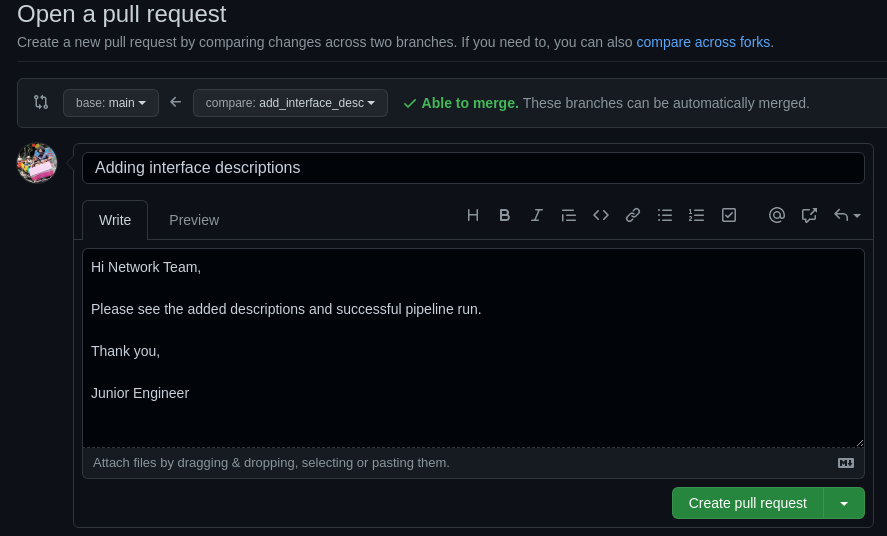
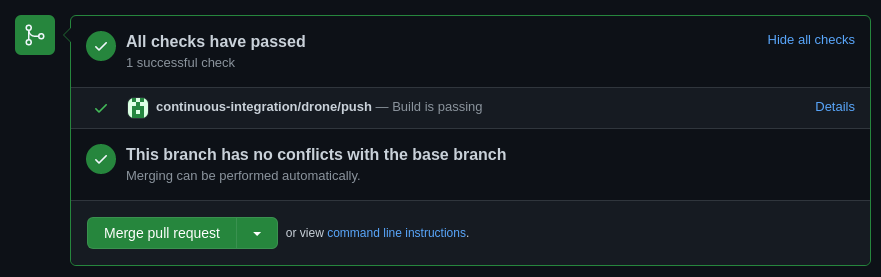
Above we can see the branch has a passing build. The reviewer or senior engineer can now merge the pull request. After that is done another pipeline run should execute but this time the changes will be applied to our network.
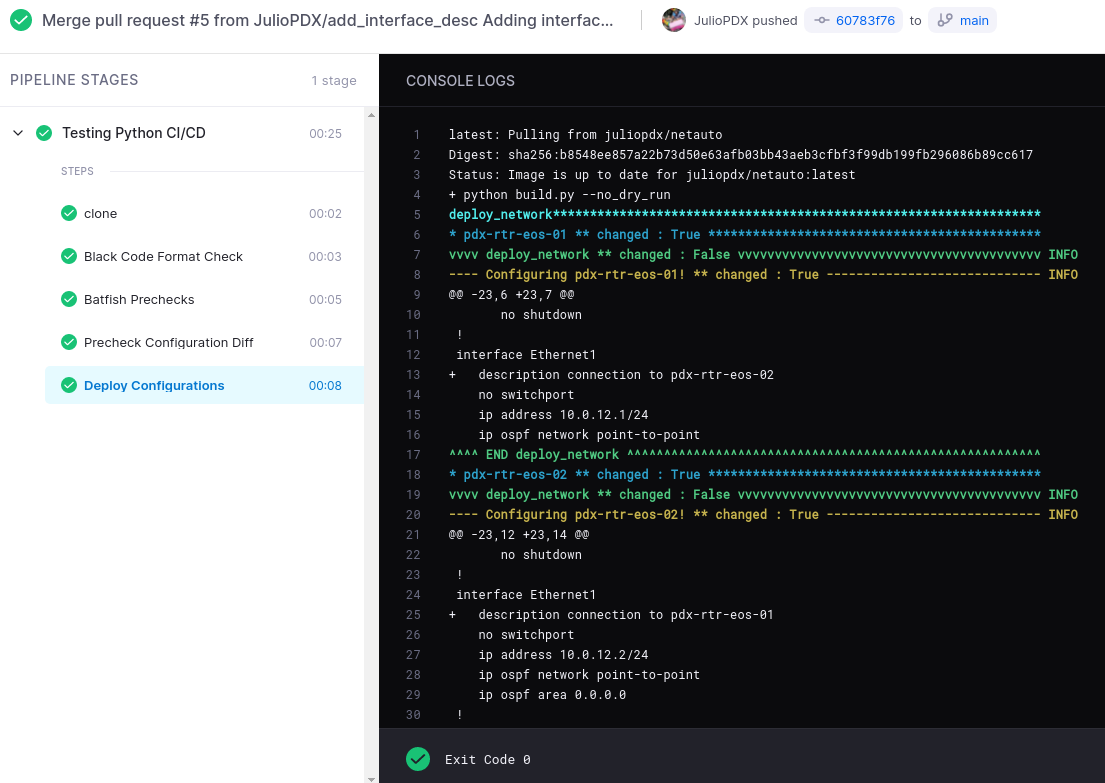
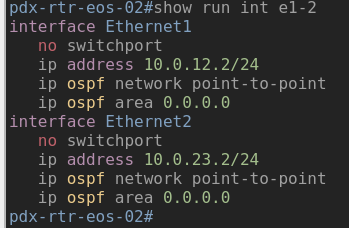
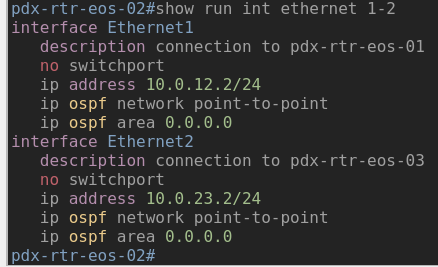
Now there is a new stage in the pipeline…deploy configurations! Lets take a look at one of the devices and see if the change was indeed applied.
Outro and Links
The change we made was really trivial but its a good way to show the new process in the world of CI/CD. Thanks again for checking out this post. I think we have one more to go in the series. The last one will go over using Suzieq for network observability and post change testing.
- GitHub Repository
- Featured image by David Clode
- Nornir
- Infrastructure as Code Blog Series by NWMichl
- Building a Network CI/CD Pipeline Part 1
- Building a Network CI/CD Pipeline Part 2
- Building a Network Ci/CD Pipeline Part 3
- Building a Network CI/CD Pipeline Part 4
- Building a Network CI/CD Pipeline Part 6