13 minutes
Building a Network CI/CD Pipeline Part 6

Introduction
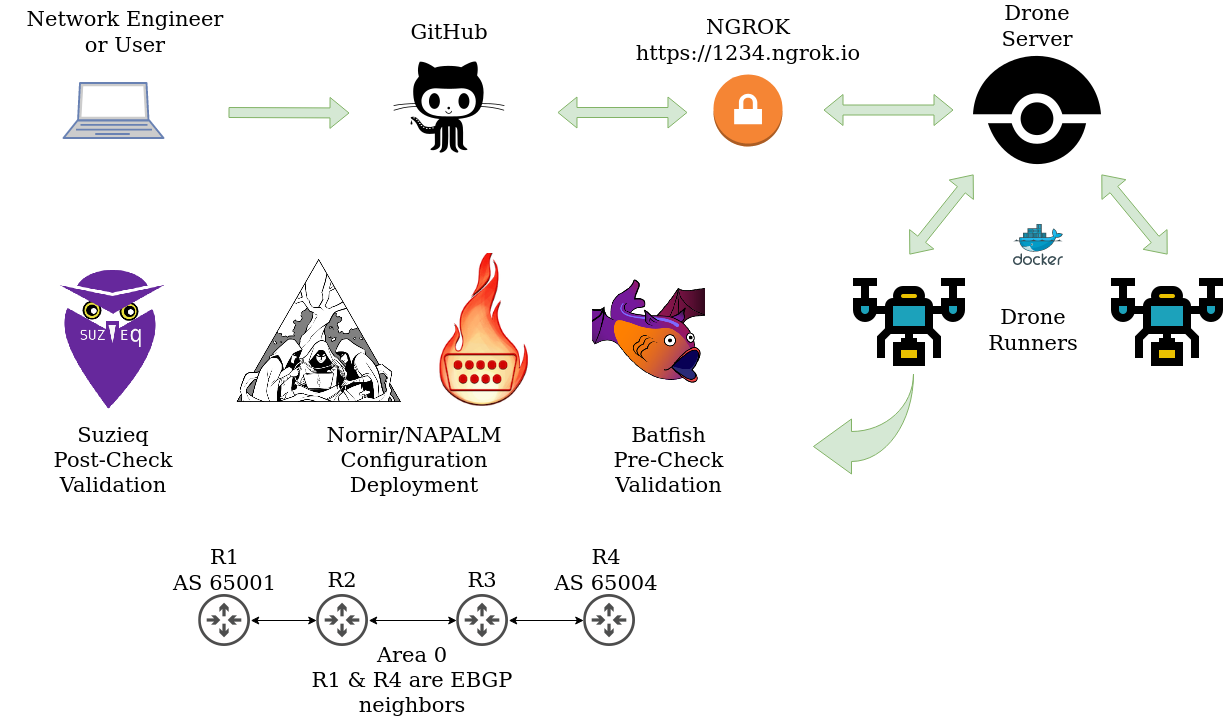
Hello all and thank you for tuning in to the last part of the network CI/CD series. It really means a lot and I hope you have learned a bit along the way. In this post we will focus on testing after a change is made, more specifically, we will be looking at Suzieq. If you stick around until the end, we will look at maintaining a “golden state” of configuration using cron and a message from Rocky.
What is Suzieq?
Suzieq allows operators and network engineers the ability to gather data about their network using an agentless model. This data is then stored in a data format known as Parquet. Once this multi-vendor data is normalized, we can begin to ask the network a numerous amount of questions. This could be things from MTU mismatches, OSPF neighbor relationship state, and many more.
Batfish and Suzieq
At this point you may be wondering if this is similar to Batfish. Batfish uses a “snapshot” of the network or a view of a change we are proposing to the network. Batfish will then build a model around this snapshot to infer if any issues are present with the configuration. There are no actual connections performed to network devices using Batfish. Suzieq on the other hand uses a Poller to continuously connect to our devices and gather network state. This data can then be used to run checks or see how our network is configured and performing. I think Batfish lends itself really well to performing precheck validation. Suzieq can perform precheck validation but for this example we will focus on post change testing. I will link a great write up by the maintainers of these respective tools at the end of this blog.
Getting Suzieq Up and Running
We wont stray far from actions that have been performed on previous posts… that’s right, more docker! Using the docker instance of Suzieq really provides the fastest way to get going. I’ll start at the root of our Ubuntu server that is running our docker containers.
Docker Container
juliopdx@drone:~$ docker ps
CONTAINER ID   IMAGE                         COMMAND                  NAMES
e5d807183f32   drone/drone-runner-docker:1   "/bin/drone-runner-d…"   runner
89b442422f25   drone/drone:2                 "/bin/drone-server"      drone
2df0b3ee02fb   batfish/batfish               "java -XX:-UseCompre…"   batfish
juliopdx@drone:~$
Building the Inventory File
At the moment Suzieq supports a built in yaml format as well as using a standard yaml Ansible inventory. For this scenario I kept things simple and used the built in format. Please note, there is word from the developers to add more dynamic inventory plugins, using Netbox for example. Below is the inventory I created for this deployment, more examples can be found in the Suzieq documentation. Please note, there will be examples of old school(0.15.0) commands and new formats introduced in version 0.16.0. If you are using a different version, please check out their documentation.
Version 0.15.0 inv.yaml
- namespace: eos
  hosts:
    - url: ssh://192.168.10.121 username=suzie password=suzie
    - url: ssh://192.168.10.122 username=suzie password=suzie
    - url: ssh://192.168.10.123 username=suzie password=suzie
    - url: ssh://192.168.10.124 username=suzie password=suzie
Version 0.16.0 inv.yaml
sources:
- name: eos-source
  type: native
  hosts:
    - url: ssh://192.168.10.121
    - url: ssh://192.168.10.122
    - url: ssh://192.168.10.123
    - url: ssh://192.168.10.124

devices:
- name: eos-devices
  devtype: eos
  ignore-known-hosts: true

auths:
- name: suzie-user
  username: suzie
  password: plain:suzie

namespaces:
- name: eos
  source: eos-source
  device: eos-devices
  auth: suzie-user
Installing the Docker Container/Poller
docker run -d --restart always -itd \
-v /home/juliopdx/suz/parquet-out:/suzieq/parquet \
-v /home/juliopdx/inv.yaml:/suzieq/inv.yaml \
--name sq-poller netenglabs/suzieq:latest
The command above is doing a few things. It will create a link to a local “/suz/parquet-out” directory and copy the “inv.yaml” file we created over to the docker container.
juliopdx@drone:~$ docker ps
CONTAINER ID   IMAGE                         COMMAND                  NAMES
a091d6fe3b07   netenglabs/suzieq:latest      "/bin/bash"              sq-poller
e5d807183f32   drone/drone-runner-docker:1   "/bin/drone-runner-d…"   runner
89b442422f25   drone/drone:2                 "/bin/drone-server"      drone
2df0b3ee02fb   batfish/batfish               "java -XX:-UseCompre…"   batfish
juliopdx@drone:~$
Now we will attach to the container and get the service running. To disconnect from the Poller and leave the service running, type “CTRL + p, CTRL + q”
juliopdx@drone:~$ docker attach sq-poller
root@a091d6fe3b07:/suzieq# sq-poller -D inv.yaml -k # version 0.15.0
root@eceb70607520:/suzieq# sq-poller -I inv.yaml # version 0.16.0+
Side Note, The Suzieq CLI
In my case I will be interacting with Suzieq using their Python library and the Poller, but you can interact with Suzieq using a CLI or GUI as well. For the moment, the Poller has most likely gathered some data about our network. Lets stop the Poller(CTRL + c) and connect to the CLI!
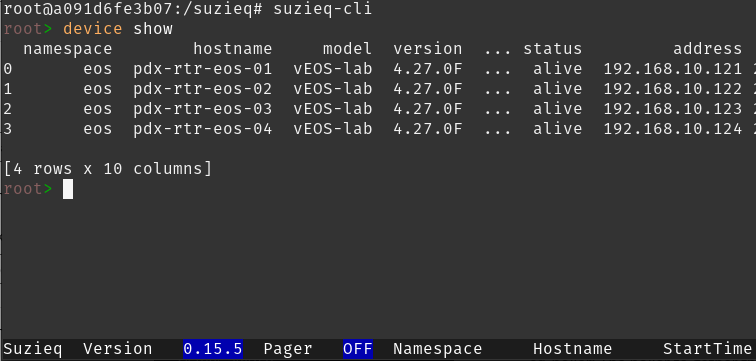
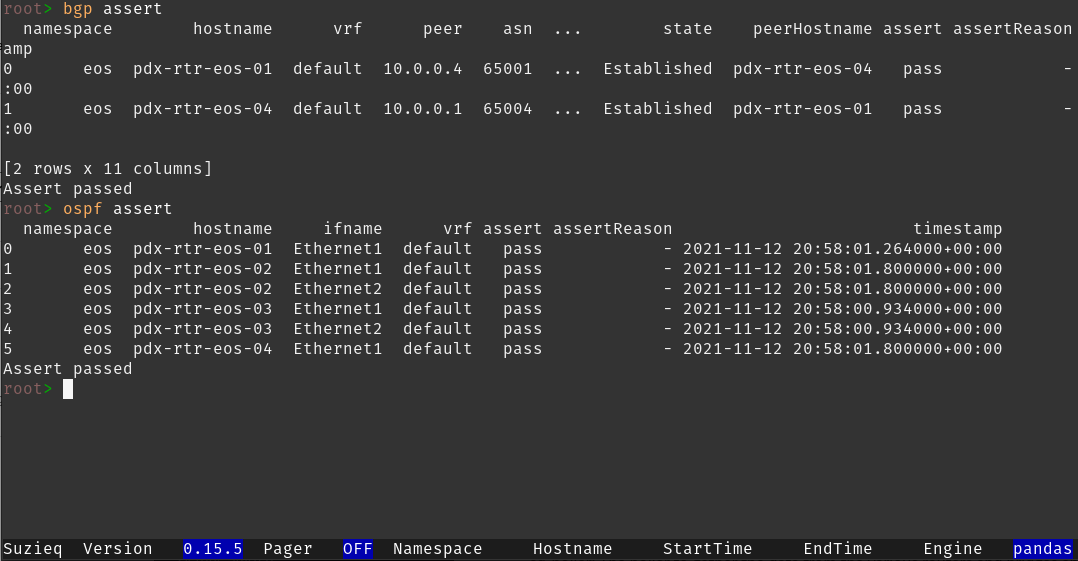
From the CLI we can quickly explore a ton of information about our network and run some asserts to see if our routing protocols are working as expected. As an example below are some working routing neighbor relationships and an example when one is down(I added a duplicate router ID).
Assert Pass
Assert Fail
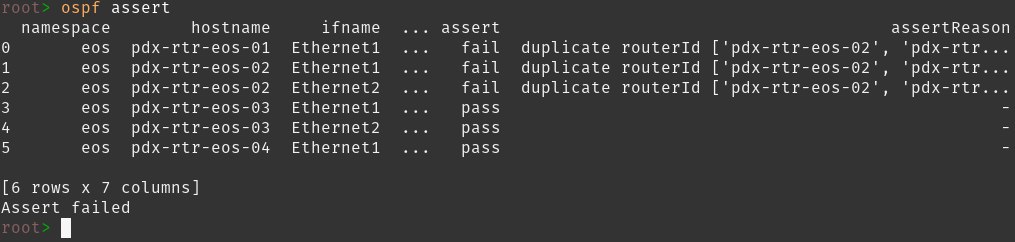
I think you get the idea. The Suzieq CLI is a quick way to explore not only the capabilities of Suzieq but also your network. At this point lets exit the CLI, restart the Poller, and exit from the container(CTRL + p, CTRL + q).
root> exit
root@a091d6fe3b07:/suzieq# sq-poller -D inv.yaml -k # version 0.15.0
root@eceb70607520:/suzieq# sq-poller -I inv.yaml # version 0.16.0+
read escape sequence
juliopdx@drone:~$
Directory Permissions
You may not run into this but in my case I ran into an issue where I had to give more permissions to the directory on my host machine running the containers.
sudo chmod -R a+rwx suz/
The Challenge: Getting the Data to the Pipeline Runner
The Poller collects a wide range of data from our network devices, to get an idea of what is being collected, check out the tree breakdown below.
juliopdx@drone:~$ tree -d -L 3 suz
suz
└── parquet-out
    ├── arpnd
    │   └── sqvers=1.0
    ├── bgp
    │   └── sqvers=2.0
    ├── coalesced
    │   ├── arpnd
    │   ├── bgp
    │   ├── devconfig
    │   ├── device
    │   ├── ifCounters
    │   ├── interfaces
    │   ├── lldp
    │   ├── ospfIf
    │   ├── ospfNbr
    │   ├── routes
    │   ├── sqCoalescer
    │   ├── sqPoller
    │   ├── time
    │   └── vlan
    ├── devconfig
    │   └── sqvers=1.0
    ├── device
    │   └── sqvers=2.0
    ├── ifCounters
    │   └── sqvers=1.0
    ├── interfaces
    │   └── sqvers=3.0
    ├── lldp
    │   └── sqvers=1.0
    ├── ospfIf
    │   └── sqvers=1.0
    ├── ospfNbr
    │   └── sqvers=2.0
    ├── routes
    │   └── sqvers=2.0
    ├── sqPoller
    │   └── sqvers=2.0
    ├── time
    │   └── sqvers=2.0
    └── vlan
        └── sqvers=2.0

42 directories
juliopdx@drone:~$
Here is where things got interesting. In our pipeline, every run stands up a fresh docker container to execute our steps. How can we expose this data to the container to run our Python test scripts against? With a bit of research I came to find this golden nugget. So it is possible! But there’s another caveat, it must be from trusted repositories. This led me to recreating the drone server and runners, but this time giving my GitHub user account admin privileges. I have updated the previous blog to reflect this change. Below is the same example in the previous blog post.
docker run \
  --volume=/var/lib/drone:/data \
  --env=DRONE_GITHUB_CLIENT_ID=your-id \
  --env=DRONE_GITHUB_CLIENT_SECRET=super-duper-secret \
  --env=DRONE_RPC_SECRET=super-duper-secret \
  --env=DRONE_SERVER_HOST=drone.company.com \
  --env=DRONE_SERVER_PROTO=http \
  --env=DRONE_USER_CREATE=username:{{GitHub-Username}},admin:true \
  --publish=80:80 \
  --publish=443:443 \
  --restart=always \
  --detach=true \
  --name=drone \
  drone/drone:2
After that was done it was just a matter of flipping a flag under the repository settings.
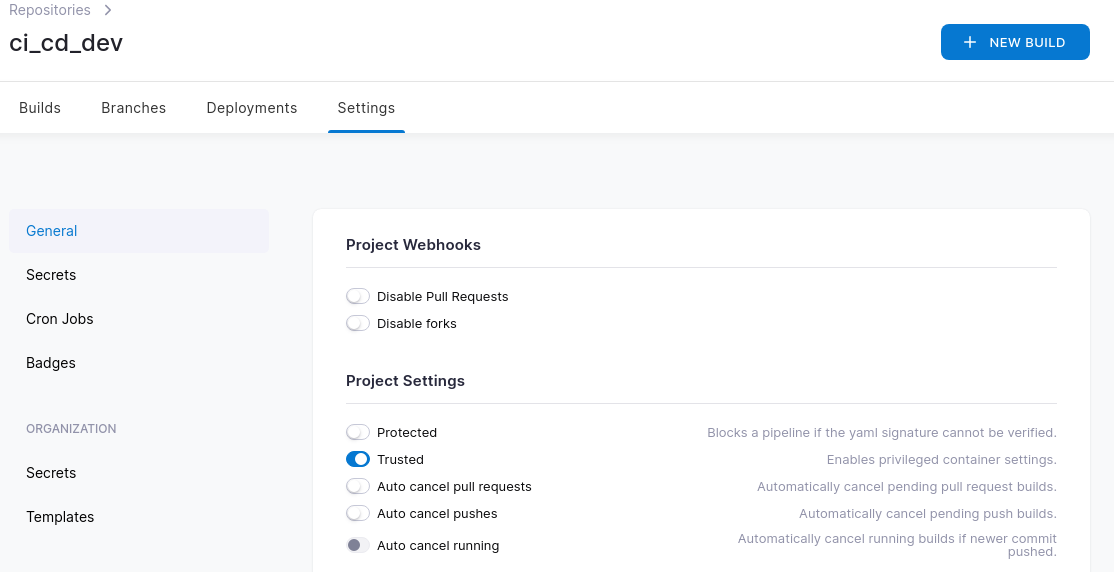
.drone.yml Updates
Now that everything is set correctly, we have to update our pipeline file to include the Suzieq steps and mount the host directory to the runner. Below is an example. Lines 14-17 are naming a volume and then giving it a path that is on our Ubuntu host. Lines 10-12 attach that volume to the runner at a specified path.
.drone.yml
- name: Suzieq Check
  image: python:3.8
  commands:
  - pip install suzieq rich
  - python test_suzieq.py
  when:
    branch:
    - master
    - main
  volumes:
  - name: suzieq
    path: /tmp/suz

volumes:
- name: suzieq
  host:
    path: /home/juliopdx/suz
Suzieq and Python
The final piece was actually getting a Python script to interact with the mounted data. If you are using Python, Suzieq will look at either ./suzieq-cfg.yml or ~/.suzieq/suzieq-cfg.yml for a configuration file. There is a lot that can be modified here but the most important I think is where the parquet data is stored. Below is my configuration file for reference.
suzieq-cfg.yml
data-directory: /tmp/suz/parquet-out
temp-directory: /tmp/suzieq
logging-level: WARNING

analyzer:
  # By default, the timezone is set to the local timezone. Uncomment
  # this line if you want the analyzer (CLI/GUI/REST) to display the time
  # in a different timezone than the local time. The timestamp stored in
  # the database is always in UTC.
  timezone: America/Los_Angeles
Suzieq Python Examples
Lets start with a few examples in the Python interpreter.
Import required libraries
(suzie-venv) juliopdx@drone:~$ python
Python 3.8.10 (default, Sep 28 2021, 16:10:42)
[GCC 9.3.0] on linux
Type "help", "copyright", "credits" or "license" for more information.
>>> import pandas as pd
>>> from suzieq.sqobjects import get_sqobject
Next we will get a sqobject from the data that has been gathered from the Poller. In this case we are grabbing the latest interfaces data.
>>> int_tbl = get_sqobject("interfaces")
>>> int_tbl().get() #data omitted for brevity
   namespace        hostname       ifname state adminState      type    mtu
0        eos  pdx-rtr-eos-02         MGMT    up         up       vrf   1500
1        eos  pdx-rtr-eos-02    Ethernet5    up         up  ethernet   9214
2        eos  pdx-rtr-eos-02    Ethernet4    up         up  ethernet   9214
3        eos  pdx-rtr-eos-02    Ethernet7    up         up  ethernet   9214
4        eos  pdx-rtr-eos-02    Ethernet6    up         up  ethernet   9214
5        eos  pdx-rtr-eos-02    Ethernet3    up         up  ethernet   9214
6        eos  pdx-rtr-eos-02    Ethernet8    up         up  ethernet   9214
7        eos  pdx-rtr-eos-02  Management1    up         up  ethernet   1500
8        eos  pdx-rtr-eos-02    Ethernet1    up         up  ethernet   1500
9        eos  pdx-rtr-eos-02    Ethernet2    up         up  ethernet   1500
10       eos  pdx-rtr-eos-04    Ethernet6    up         up  ethernet   9214
11       eos  pdx-rtr-eos-04         MGMT    up         up       vrf   1500
12       eos  pdx-rtr-eos-04    Ethernet5    up         up  ethernet   9214
13       eos  pdx-rtr-eos-04    Ethernet4    up         up  ethernet   9214
14       eos  pdx-rtr-eos-04    Ethernet7    up         up  ethernet   9214
15       eos  pdx-rtr-eos-04    Ethernet1    up         up  ethernet   1500
16       eos  pdx-rtr-eos-04    Ethernet2    up         up  ethernet   1500
17       eos  pdx-rtr-eos-04    Loopback1    up         up  loopback  65535
18       eos  pdx-rtr-eos-04    Ethernet8    up         up  ethernet   9214
19       eos  pdx-rtr-eos-04  Management1    up         up  ethernet   1500
20       eos  pdx-rtr-eos-04    Ethernet3    up         up  ethernet   9214
21       eos  pdx-rtr-eos-03         MGMT    up         up       vrf   1500
22       eos  pdx-rtr-eos-03    Ethernet5    up         up  ethernet   9214
23       eos  pdx-rtr-eos-03    Ethernet7    up         up  ethernet   9214
24       eos  pdx-rtr-eos-03    Ethernet6    up         up  ethernet   9214
25       eos  pdx-rtr-eos-03    Ethernet4    up         up  ethernet   9214
26       eos  pdx-rtr-eos-03    Ethernet3    up         up  ethernet   9214
27       eos  pdx-rtr-eos-03    Ethernet2    up         up  ethernet   1500
28       eos  pdx-rtr-eos-03    Ethernet8    up         up  ethernet   9214
29       eos  pdx-rtr-eos-03  Management1    up         up  ethernet   1500
30       eos  pdx-rtr-eos-03    Ethernet1    up         up  ethernet   1500
31       eos  pdx-rtr-eos-01    Ethernet5    up         up  ethernet   9214
32       eos  pdx-rtr-eos-01  Management1    up         up  ethernet   1500
33       eos  pdx-rtr-eos-01    Ethernet8    up         up  ethernet   9214
34       eos  pdx-rtr-eos-01    Loopback1    up         up  loopback  65535
35       eos  pdx-rtr-eos-01    Ethernet2    up         up  ethernet   1500
36       eos  pdx-rtr-eos-01    Ethernet3    up         up  ethernet   9214
37       eos  pdx-rtr-eos-01    Ethernet1    up         up  ethernet   1500
38       eos  pdx-rtr-eos-01    Ethernet6    up         up  ethernet   9214
39       eos  pdx-rtr-eos-01    Ethernet7    up         up  ethernet   9214
40       eos  pdx-rtr-eos-01    Ethernet4    up         up  ethernet   9214
41       eos  pdx-rtr-eos-01         MGMT    up         up       vrf   1500
>>>
You can also filter on data when making these calls. Maybe we only care about certain interfaces from a particular host?
>>> int_tbl().get(hostname=["pdx-rtr-eos-01"], ifname=["Ethernet1", "Ethernet2"])
  namespace        hostname     ifname state adminState      type   mtu  ipAddressList
0       eos  pdx-rtr-eos-01  Ethernet2    up         up  ethernet  1500  [192.168.1.1/24]
1       eos  pdx-rtr-eos-01  Ethernet1    up         up  ethernet  1500  [10.0.12.1/24]
>>>
Maybe we want to see what device owns a particular route?
>>> routes_tbl = get_sqobject("routes")
>>> routes_tbl().get(prefix=["10.0.0.1"], protocol="connected")
  namespace        hostname      vrf       prefix nexthopIps         oifs   protocol
0       eos  pdx-rtr-eos-01  default  10.0.0.1/32         []  [Loopback1]  connected
>>>
What I’ve shown you above and what is included in the pipeline post check is just a small subset of what Suzieq can do. Below is a very basic script that will pull data from the parquet directory, depending on a pass or fail, different messages will be printed. If any failures are seen, a counter will run and exit the program with a code of 1. This will signal the pipeline to register the run as a failure. I’ll include a few snapshots of running this in the terminal, the rich library makes even the failures look pretty.
test_suzie.py
import sys
import pandas as pd
from suzieq.sqobjects import get_sqobject
from rich import print


# OSPF Testing
ospf_tbl = get_sqobject("ospf")
ospf_df = pd.DataFrame(ospf_tbl().aver())
ospf_fail = 0
for index, row in ospf_df.iterrows():
    if row["assert"] != "pass":
        print(
            f":triangular_flag_on_post: OSPF, {row['hostname']} {row['ifname']} {row['assertReason']} :triangular_flag_on_post:"
        )
        ospf_fail += 1

# BGP testing
bgp_tbl = get_sqobject("bgp")
bgp_df = pd.DataFrame(bgp_tbl().get())
bgp_fail = 0
for index, row in bgp_df.iterrows():
    if row["state"] != "Established":
        print(
            f":triangular_flag_on_post: {row['hostname']}(AS {row['asn']}) to {row['peer']}(AS {row['peerAsn']}) is in {row['state']} state :triangular_flag_on_post:"
        )
        bgp_fail += 1

if bgp_fail == 0:
    print(":white_heavy_check_mark: All BGP checks passed :white_heavy_check_mark:")
if ospf_fail == 0:
    print(":white_heavy_check_mark: All OSPF checks passed :white_heavy_check_mark:")
if bgp_fail or ospf_fail != 0:
    sys.exit(1)
Below is an example of me adding a duplicate router ID on pdx-rtr-eos-01.
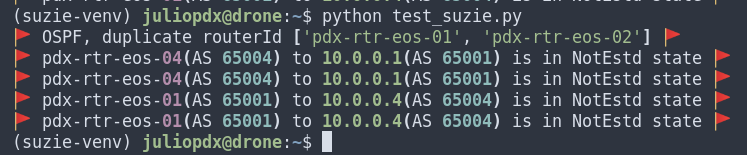
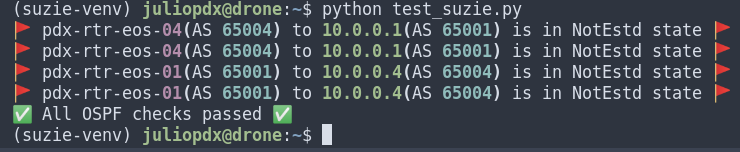
Now lets fix that issue and see if we can see the transitions on the network. OSPF neighbors should come back and BGP soon after.

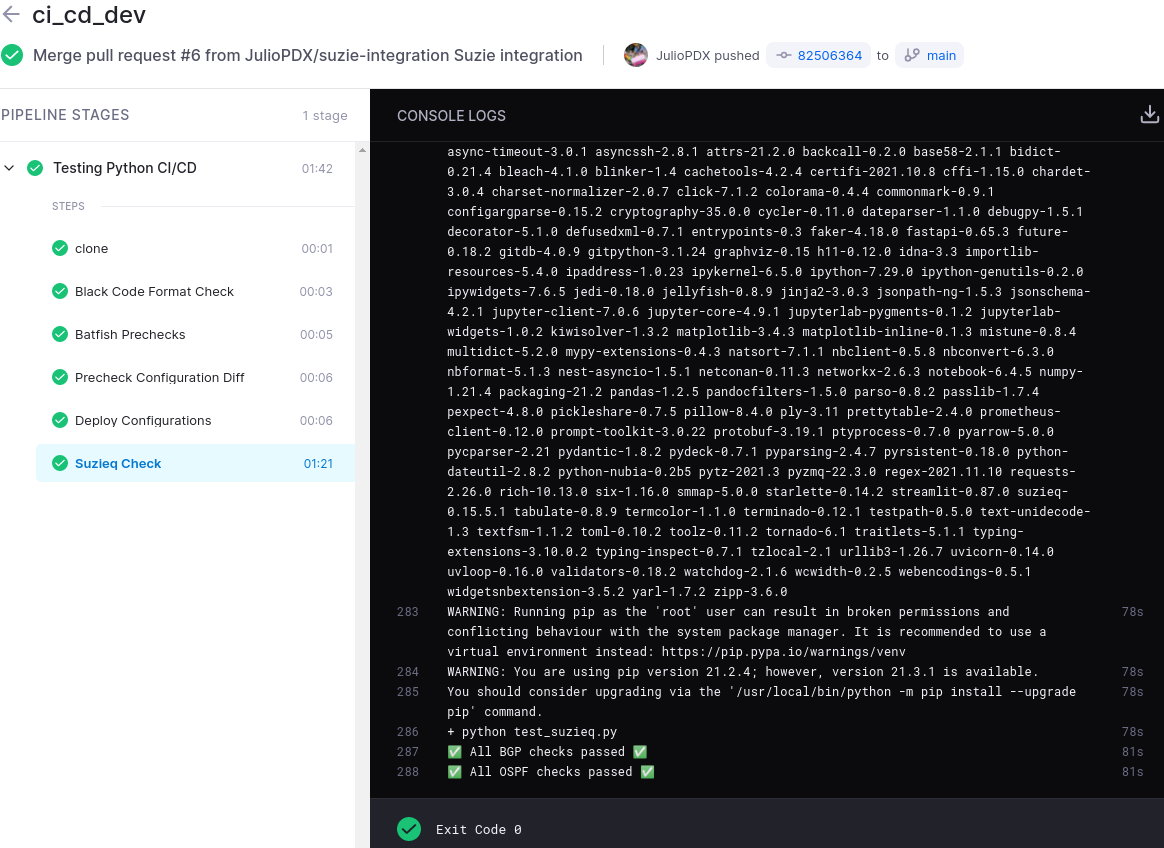
Suzieq Pipeline Run
Below is an example pipeline run after a pull request was submitted and approved. I’ll show you the last step which is new to us in this series. To my knowledge Suzieq is only tested against Python 3.7 and 3.8. Th docker container I created is based on 3.9.7. Drone makes this fairly trivial, as I can just reference another docker image and install the two dependencies we have; Suzieq and Rich.
.drone.yml
- name: Suzieq Check
  image: python:3.8
  commands:
  - pip install suzieq rich
  - python test_suzieq.py
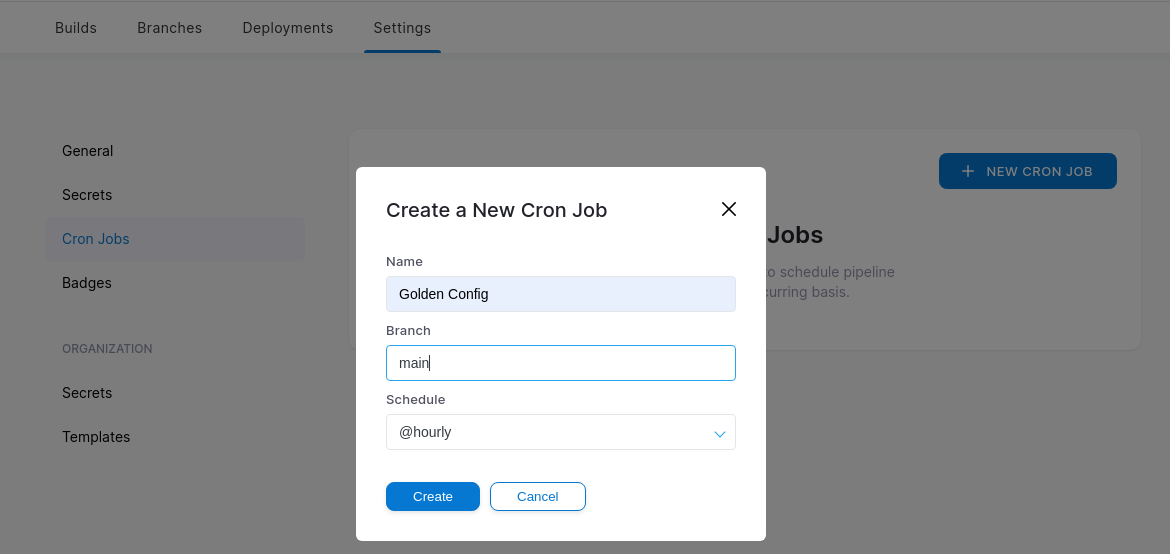
BONUS! Maintain State With Cron
Rapid fire here. Lets just say we had a rogue engineer making all kinds of changes outside of the pipeline. How could we remediate this? Drone and I’m sure other CI tools have a cron feature. Essentially, we can execute pipeline runs at set intervals. Since the main branch is our “production” state. We can set up a cron job to run every day, week, or hour??? I’m going to make some random changes to all four routers and see how the pipeline corrects them. I will set the cron job to run every hour so we don’t have to wait a day.. or a week.

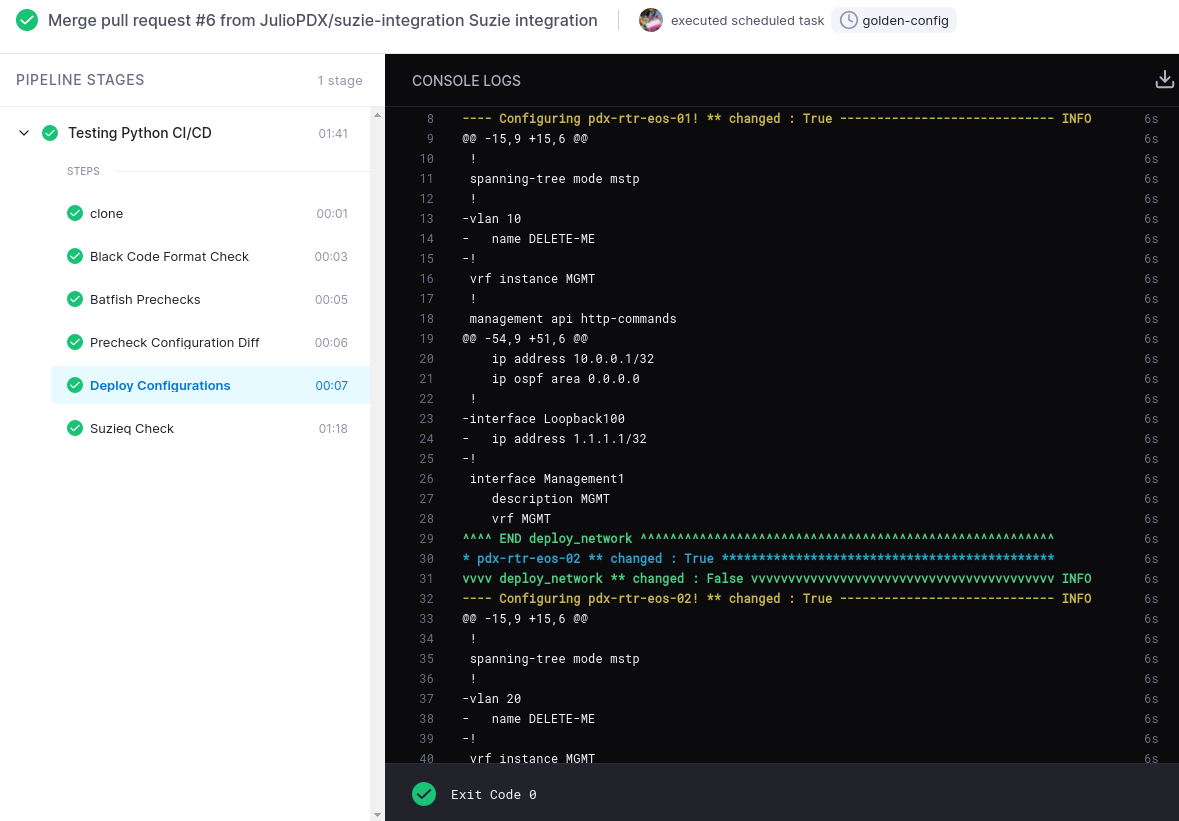
As you can see above, all the bogus VLANs and loopbacks have been removed from the configuration.
Be Like Rocky
You, me, or nobody is gonna hit as hard as life. But it ain’t how hard you hit; it’s about how hard you can get hit, and keep moving forward.
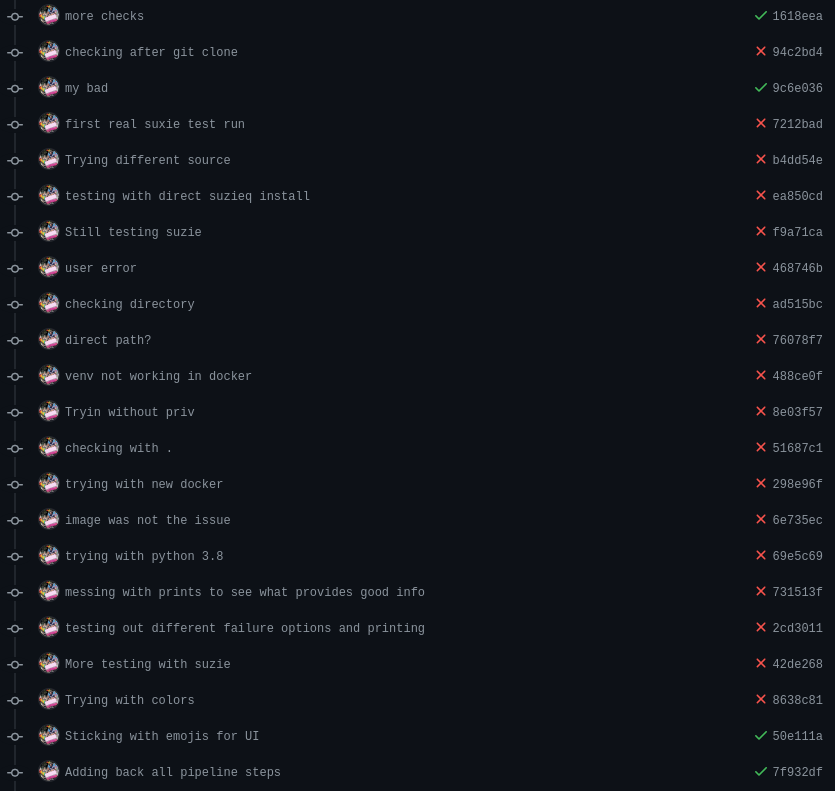
I love that Rocky quote. I’m highlighting my failures here to show you that you can do it. When learning something new you may be scratching your head or lost in the sauce. Keep going and when you hit that magical moment, its really really fun.
Outro and Links
Thank you all for reading this far. This blog series was an absolute treat to write. I hope something along the way has sparked your interest! Please note, what I’ve shown in these posts is just a subset of what these tools can do. Feel free to explore and make it better!
- GitHub Repository
- Featured Image by Frederick Marschall
- Suzieq Documentation
- Closing the Loop on Testing Network Changes by Ratul Mahajan and Dinesh Dutt
- Building a Network CI/CD Pipeline Part 1
- Building a Network CI/CD Pipeline Part 2
- Building a Network Ci/CD Pipeline Part 3
- Building a Network CI/CD Pipeline Part 4
- Building a Network CI/CD Pipeline Part 5